
Flammy's Strategy Guides: Table of Contents
|
Topic |
Information |
|---|---|
|
A guide for those brand-new to Clash of Clans, focusing on the first three days while under newbie protection. How to start your Clan off on the right foot with optimal efficiency. Frequently Asked Newbie Questions are included along with their answers. | |
|
Chapter 2 Base Defense Basics |
Basic elements of strategy and good base design. Rules of thumb for designing your first base. |
|
Advanced base design elements. Common base archetypes. Exploiting pathfinding and AI elements, | |
|
Critical before moving onto more advanced attacking is the knowledge of which unit to use, when, and how it will react. This guide covers how to use units most effectively; how they move, and why they act. This chapter goes from the basics to advanced material. | |
|
Understanding the matchmaking system, both how it works and why it matters. Learn its flaws and exploit them. | |
|
Benefits of raiding, ideal raid, limits, restrictions, and details relating to the fine art of stealing resources. Common army compositions and Risk vs Reward. Flammy's version of Farming. |
Welcome
This page is part of Flammy's Strategy Guides. Check it out for links to my other guides, as well as notes about editing and reproducing my content. I also produce Clash of Clans videos on YouTube, including a Let's Play (basically a playthough) starting at Town Hall level 4, so if you're looking for more help and advice I hope to see you over there.
How to Defend your Defenses
| Average | Decent | Best |
|---|---|---|
 |
 |
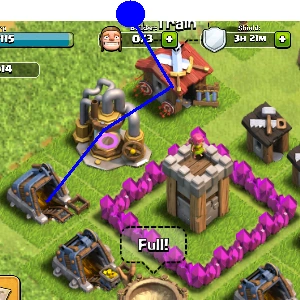 |
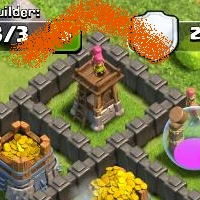
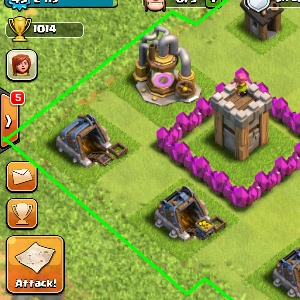
| Enemies spawning in this orange area will auto-attack the archer tower right away! Eight archers or so will easily kill this turret. | Enemies have to spawn outside of this green box, and can't immediately attack the turret. | An archer placed at the blue dot will attack the buildings in the order seen. |
Walls are good, but are not the only part in a super awesome base. The #1 mistake I see new players (or not so new players) doing is placing their defenses so they can be targeted by archers spawning outside the walls. Don't make this mistake.
The difference between 'Decent' and 'Great' has to do with the way units decide which building to attack next. It is too complicated to get into here (this 'basics' section) but I think I'll cover it later in more detail. The buildings protecting your defenses do matter – Mines/collectors will have more HP than Barracks/Builder's Huts.
Oh Gosh! Enemies Can Spawn There Too?!
| Not good! | Unless it's your enemy! |
|---|---|

|
|
Yes, enemies can spawn around the ring of your base. No, you can't build there to stop them.
Holes in bases are bad, mmk?
When you move any building or wall (but not decorations), it shows you white lines one space larger in every direction from that building. This is showing you where enemies can spawn. Make sure you don't have any holes in your base to let them spawn inside your walls. That would be bad. I will write about how to leave intentional spawn spots in your base later, in the advanced base defense chapter.
Overlapping Defenses
Another common mistake: placing all of your defenses widely spread apart, to cover as many buildings as possible. Dies very easily to several giants. Or to groups of infantry, especially archers. Or to balloons. Which I guess means it just dies to everything.
This often goes along with trying to stuff everything inside your walls, covered later.
Splash Damage: It's your friend!
Mortars (and later Wizard Towers) are your first and last line of defense against mass infantry attacks. A mortar's damage is only limited by how many troops your enemy puts down and how well you funnel them into where you want them. A fully upgraded mortar (level 8, total cost 12,560,000 gold) will do 65 damage in one shot to the units within the splash zone. In the same amount of time (5 seconds) an Archer Tower (level 1, total cost 1,000 gold) will do 55 damage to the unit it is targeting. What does this mean? It means you need to make sure your splash damage defenses are hitting enemies in groups and are protected. How do you get them to hit enemies in groups? Put them in the middle of your base – as soon as the enemy destroys a wall and funnels through it, they will be nice and bunched up for the mortars.
Where should I place my Mortar?
Somewhere very protected. Probably in the middle of your base, ideally with its own wall around it for the mortar is unable to attack at close range.
Where should I place my Air Defense?
In the middle of your base. Mass air attacks are rare (due to time to train), but not unheard of. A single, upgraded Air Defense is a wonderful deterrent, but it should be placed in the middle of your base. More specifically, it should be placed such that, if a mass balloon attack comes, It won't be the first, second, or third defense they kill.
Don't try to stuff everything inside your walls

As a counterpoint to Overlapping Defenses, don't try to enclose everything within your walls. First off you will often break Overlapping Defenses and Defend your Defenses by trying to cover everything, but secondly it is just a waste of walls. Double thick walls are better than a massive single thick wall.
What should I keep outside my walls?
Absolutely keep your Builder's Huts, Laboratory, Barracks, Army Camps and Spell Factory outside your walls. None of these matter if they get destroyed – no progress or resources are lost. Next, I would keep out Gold Mines and Elixir Collectors. Each of these has some consequence if they get attacked: Mines and Collectors can have resources stolen (but only uncollected resources). Some people really like keeping Mines/Collectors inside – it depends on how often you play. If you do keep any inside, make sure they are your highest-level units.
What does that leave? Town Hall, Defenses, Elixir Storage, Gold Storage. All of these should be inside your walls, and as well-protected as possible. If you are at a stage in the game where you don't care about trophies, you can also kick your Town Hall outside the walls. You will be easy to defeat, but if you're only trying to protect your resources, the Town Hall takes up a lot of space.
Is making the base square or rectangle hard for other players?
No, it's not. I personally find bases with square or rectangle bases easy to destroy, because there aren't any extra walls that are going to be the obstacles in my way. One or two wall breakers can easily breach through. If you have extra walls, use them for making it more difficult for players. You should put your base into a maze or with lots of layers. Wall breakers will also go for walls that are connected with at least three other walls. This means placing walls that stick out of the perimeter will be focused first.
How to build a base: From Start to Finish
This series of videos shows me building a base when Town Hall Level 5. I explain what I am thinking all along the way, from major design decisions (what should I put down first?) to more minor ones (where should my highest and lowest level walls go?). This is a 3-part base build. The important thing to learn here is not the end result (the base build), but the process I go through to get there. We learn how to think in this set of videos.
Part 1

Part 2

2-2 Part 2 3 Let's Play Clash of Clans - Base Design (TH5) Spiral Base (Gameplay Commentary)-0
Part 2 of 3
Part 3

2-2 Part 3 3 Let's Play Clash of Clans - Santa Bombing Run Inbound! (Gameplay Commentary)
Part 3 of 3
Conclusion
Thanks for reading my guide. You can find more of my guides at Flammy's Strategy Guides. Check it out for links to my other guides, as well as notes about editing and reproducing my content. I also produce Clash of Clans videos on YouTube, including a Let's Play (basically a playthough) starting at Town Hall level 4. Thanks again for reading, and hope to see you on my YouTube Channel.
Feedback
If this Strategy Guide contains any inappropriate content, please report it here: Clash of Clans Wiki:Report