

This is Clash of Clans Wiki's very own Strategy Guide. Players who consider themselves experts at different aspects of the game are welcome to add their own touch to this guide with the aim of helping other less experienced players.
The best thing about this kind of strategy guide is that everyone has something to add. Even if you are a level 20, all the level 19s out there will greatly appreciate your help. For the level 100s out there, there will still be people who are going through the part of Clash of Clans you can give the best tips for.
This guide is not meant to be as detailed as the actual pages themselves. The strategy guide includes various links to pages relevant to Clash of Clans, and these pages have much more detail on the topics they are describing than the guide. You may also find these pages by using the search feature of the wiki.
This guide also has sub-pages, you can check out these sub-pages below.
- Stealing Dark Elixir
- Trophy Hunting
- Builder Base
- Clan Capital
Chapter 1: Beginning from the Beginning
When you first start on Clash of Clans, you are given a tutorial. Note that you don't have to spend the Gems it recommends and you do not need an army of Wizards to take out the goblins. After you have completed this tutorial and come to grips with the game, you will face several looming problems.
You will have a three-day shield that prevents other players from invading your base. This is essential for getting your Defensive Buildings and Resource Buildings to a safe level before you can be attacked.
The first thing you need to do is upgrade your Elixir Collectors and Gold Mines to a sensibly high level. We recommend at least level 4 at first. This will give you enough of a resource base to keep you going for a while.
Once you have completed this, you need to see your storages. You have a maximum of two storages of each at first. These resources are elixir and gold, and it is probably best to get both to maximize your resource amounts.
Don't worry too much about Barracks and Army Camp upgrades at this early stage as they won't protect you from invasion and will only help when you are on the offensive, but do try and get your Town Hall to level three.
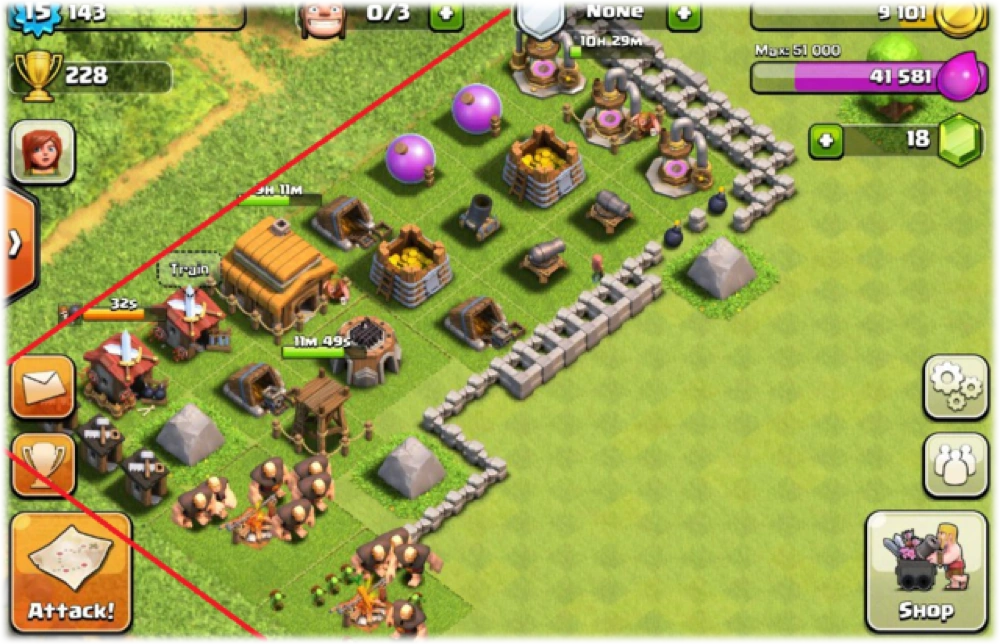
Example of a base with unprotected corners. Enemy troops can spawn in the red.
As soon as you have completed these tasks you must turn to your defensive buildings. You will already have a cannon from the tutorial, but apart from that, your first defenses need to be your most important ones, Walls. Use all your walls around your buildings, bearing in mind that the buildings that are most valuable are your storages and your Town Hall. Make sure you can surround your storages and Town Hall completely, but remember that enemies can spawn troops in the corners too - it's not safe to build with no walls in the corner. Surround your base with the less important buildings to slow your attackers and upgrade your walls to at least level 2.
When you are confident your base is stable, begin the Town Hall level 4 upgrade and start building your cannons and archer towers. Remember not to attack PvP in order to get that gold. Attacking PvP will reduce your shield length by three or more hours each time. Before upgrading to a higher Town Hall level, it may be a good idea to max out mines and collectors as they will be boosted as part of the boosts given when upgrading the Town Hall to a new level. Upgrade your defenses as much as possible and save up to get a mortar as soon as you can. Put the Mortar with your Town Hall and your storages in your walls and keep upgrading them. You want to fit as many of your defensive buildings in your walls as you can whilst keeping your less useful ones outside your base. But remember not to cram all of your defenses in layer of walls. For example, put your Town Hall in its own separate layer of walls. Then put your storages in their own layer of walls. Then pair up, let's say, your archer tower and cannon, and give them their own layer of walls. Keep upgrading your walls and your turrets and you are ready to face the world.
Chapter 2: Your First Raid
Since your three-day shield is such a blessing, it is not advised that you break it early by going on an attack. Once the time has naturally run out, you are ready to go on the search for trophies and resources.
Attacking involves three fundamental parts covered in depth here; they will be explored later in terms of applying them at higher levels.
Army composition
At later levels, army composition is an essential part of strategy. Based on the type of bases you will encounter at first, we recommend a simple army of only Barbarians at first, as well as any Wizards from from the tutorial, if you still have any. This should help guarantee a win against anyone with badly used walls and poorly placed, exposed mortars.
Before you begin your battle, it is a good idea to train excess troops in your Barracks. By the time you have finished raiding, they will most likely be done.
Picking the perfect base
At an early level, you can afford to be picky about who you attack. Huge numbers of people begin the game and then quit very quickly (called inactives), so you can look through bases to find the best catch. Ideally, you want a base that you can 3-star for a large number of Trophies to help to lift you up into the trophy levels of more active players.
Look for badly deployed or nonexistent walls with an exposed Town Hall and weak defenses. At an early level, also try finding bases with exposed mortars that you can easily wipe. Ultimately you want someone with a good amount of resources and a good amount of trophies up for grabs, in which you can see the stats on the left side when scoping out the bases. Winning a battle like this will set you well on your journey to the top of the leaderboards.
Strategy
Strategy is a pretty endless subject - there are countless variations on attack techniques. However, there is one beginner strategy that always works. At the very beginning of the battle, get rid of the mortar first, or else its splash damage will wipe your barbs with ease. Remember that a Mortar has a "blind spot" where it can't shoot; this spot is a 3-tile radius around it. If your Barbarians manage to enter that blind spot, they're good to go and will take out the mortar without fear of it attacking them. Afterward, simply spam all your remaining Barbarians and they should do a good job wiping out the remainder of the base.
When attacking starts to become trickier, feel free to add Archers in the mix.
Chapter 3: Defensive Strategies
Building up a strong defense is just as important as a good attack. Typically when building up your village, you don't want to upgrade your Town Hall too fast without upgrading your surrounding defenses and resources first. Upgrade everything equally, because a high-leveled Town Hall won't help anything if you have low leveled Defensive Buildings or Resource Buildings.
Defensive Buildings
Upgrade your Town Hall enough to let you continue upgrading your buildings. As said above, don't over-upgrade your Town Hall, or your gold will be wasted when it could have been spent on upgrading defenses. Carefully watch any replays of people attacking you and see if you won or lost. If you won, your defenses are doing their job. If you lost, think about where you could put your defensive buildings in a better spot. Typically, people put their Mortars in the center of their base because of its blind spot and long range. We will explain more about base design in the next chapter but think carefully about how to better your base.
Once you get your first few defense results, keep upgrading your defenses. There are many different opinions on which ones to upgrade first, so choose which ones you think would fit your base.
Clan Castle Troops
If you are in a clan, the rest of your clanmates can donate troops to you. These troops will defend your base if you are attacked. Remember that a clan castle filled with Archers can deal a lot more damage than your turrets, but the archers are very easy to kill. Troops with preferred targets will target their preferred targets over any clan castle troops. This is important when dealing with giant rushes! A Giant will continue to attack a turret even when there are clan castle troops behind it shooting. This can make clan castle troops a key part of a good defensive setup.
Chapter 4: Base Design
Despite popular belief, "cool" looking bases are not better. When looking for inspirations of a base, you don't want to base yours off of the Batman logo. Anyways, onto the actual base design. First, you should figure out if you are farming or hunting trophies.
Farming:
If you're farming (not recommended until you've got the hang of the game) then put your resource storages closer to the center than your Town Hall. Make sure to place your storages at the very center of your base while defenses surround them. By doing this, the enemies will have a very hard time getting to your resources.
Old guides suggest putting the Town Hall outside, however, this is not a good idea in modern Clash of Clans. If the Town Hall is outside and unprotected, people who are looking for trophies will attack that Town Hall and end the battle. This is a problem as the Town Hall houses a large number of resources which is stolen when the building is destroyed. In addition, a shield is not obtained by simply destroying a Town Hall, which will leave you vulnerable to others attacking you after the 30 minute guard you earned ends. For you to get a shield attackers need to get 30% and they need to have deployed 1/3rd of the maximum army space available to the defenders Town Hall. Supercell deemed "town hall sniping" in this fashion was a cheap strategy, and thus removed the free shield for defenders from destroying Town Halls, and massively increased the resources the Town Hall had, to invalidate the strategy.
Trophy Hunting:
If you're trophy hunting, then protect your Town Hall at all costs by putting it in the center, placing defenses around it, making sure you have extra walls around it, etc. Also make sure that you don't have 50% of your buildings outside of walls, because your opponents can pick off those buildings (with archers) and get one star by doing so, costing you trophies. You also want to protect your Resource Buildings, but depending on how determined you are to keep trophies rather than resources, some players make sure their defenses are still safe and able to defend the Town Hall and therefore leaving the resources unprotected.
In a nutshell, position the structures you want to protect most (usually gold/elixir/dark elixir storages, or the town hall) in the middle, within firing range of all your defenses.
You should place Gold Mines and Elixir Collectors outside of this. Dark Elixir Drills are for Dark Elixir; raiders can steal 75% of your collected Dark Elixir from the drill itself. However, only 4-6% can be stolen from the storage, so put the drills inside your walls. If you are reading this, you most likely won't have the Dark Elixir unlocked quite yet, so you shouldn't need to worry yet. By positioning the mines and collectors on the outside like this, your defenses can focus on defending your most important buildings. They will still attack enemy units within range.
Follow these with miscellaneous buildings that won't give resources but act as buffers to your resources (ex. Builder's Hut, Laboratory, etc.). This lets long range defensive structures like Mortars and Archer Towers deal some extra damage to troops.
The next chapter explains more about the offensive side of farming and trophy hunting.
Walls Positioning
DO:

Your Walls should be like the example to the right to avoid Archers shooting over it, and Wall Breakers will have to be deployed in 2 waves. You could also hide Traps between the walls.
DO NOT:
Protect unimportant buildings such as Builder's Hut.
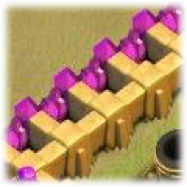
Double layering the wall without any spaces (which make it easier for Wall Breaker to break through). This looks something like the example to the right.
Use Decorations or Obstacles to fit in the spaces between the Walls.
Chapter 5: Farming
Pick and choose your targets. You're farming, not trophy hunting. You're looking for targets with lots of available resources and weak defenses against your army. When farming, look for bases that have most if not all of its resources in their collectors and mines (not in their storages). If the resources are in the collectors and mines, you can drop a few goblins and archers on each building and take all the resources. Note: When you are farming, you will usually lose trophies quickly due to some defensive and offensive losses.
For less experienced players, we would recommend a simple army of Goblins, up to your max if your army camps store less than 30. If your army camps store at least 50, it is a good idea to compose your army with 30-35 Goblins, at least 2 Giants, and the rest Archers.
If you have a capacity of at least 100 in your Army Camps, we would recommend the simple Goblin army, or 60-70 Goblins, several Giants as meatshields, and the rest archers for picking off buildings at a distance.
If you have a capacity of at least 150 in your camps, we would recommend 80-90 Goblins, around 5 Giants, and the rest Archers.
If you have 200 Army Camp spaces, then try 100 Goblins, 10 Giants as meatshields, a few Wall Breakers and the rest Archers.
An old tactic to farming was to place the Town Hall outside of your base undefended, as it used to give a shield when destroyed, however this no longer works as they no longer grant a shield upon destruction, and the Town Hall will hold loot that can be stolen.
Chapter 6: Trophy Hunting
Pick and choose your targets. You're trophy hunting, not farming. You're looking for targets with exposed Town Halls that you can easily pick off with a few archers. You may find a few bases will Town Halls outside because they're old farming bases or are trying to drop trophies. When you find these exposed town halls (usually in corners) drop around 3 archers and they will destroy the town hall, unless it has a giga weapon..
When you're looking for bases as a trophy hunter, make sure you attack bases that you know you can destroy. Using that extra gold and extra time will benefit your trophy count in the long run.
Chapter 7: Balancing your Base
You should usually try to max out everything for your Town Hall level so that you get the best advantage when you upgrade the Town Hall.
When upgrading your buildings, try not to prioritize defensive buildings over resource and army buildings. Try having one builder upgrading one building in each category. This will make sure you have a well-rounded base with a good army; not a base with maxed defense and a level 2 barracks.
You should always try to be upgrading something in the Laboratory as it does not require a builder to do so.
Always upgrade your buildings in the least time-consuming way, so try to keep all your cannons around the same level (ex. some 5, some 6) instead of having them spread apart (ex. one 10, the rest 2). Also, try and upgrade the time-consuming buildings while you go to bed so in the morning the upgrade will be finished or almost finished. Keep the short upgrades that take only a few hours for during the daytime while you're actually playing.
Also, not all defensive structures are the same. It is important to have a centralized Clan Castle and a Mortar triangle in the center, all covered by walls. Keep another defensive building nearby to protect the mortars, as the mortars have a "dead zone" surrounding them where they will not target enemy troops. Mortars also do not target air units so the defense that you use to cover the mortar should be able to target air units as well. Mortars do huge splash damage to your enemies and will also destroy tonnes of enemies while the enemy is destroying other buildings. As you gain more trophies, you will also find defenses with Wizard Towers, which can be even more dangerous due to its higher attack rate.
Remember: Having a powerful army is very important because you have a better chance of destroying the enemy's defenses and stealing all their loot.
Chapter 8: Raids
Raiding is what Clash of Clans is centered around. There are hundreds and thousands of strategies out there created by different players, so pick one that fits your style. Are you more of a conservative player and like to play the game out or do you love to watch Hog Riders cruise through the base like they don't even care what's shooting at them? Find your style.
There are plenty of attack strategies on the wiki. Search around to find what fits you, or create your own style. Watching YouTube videos of attacks is very helpful to see how the player is placing the troops. If you are more of a conservative player, you might like using Giants as a tanking unit, and putting units like Wall Breakers and Archers behind him. If you like fast-paced gameplay, you might like using Hog Riders with a Rage Spell.
Chapter 9: Builder Base
At Town Hall level 4, you can repair the boat on the coastline which brings you to a new location called the Builder Base. This is similar to the regular village, but instead of regular raids, there are Versus Battles where two players attack each other's bases to try to get the most stars in order to win.
The versus battle mode is not the only difference from the main village. You can only select one troop type per Army Camp in the Builder Base. Troops can be generated and switched instantaneously in the Builder Barracks or when planning an attack. Walls come in lines of five segments. You start out with only one builder in the Builder Base.
Generally, as it is only possible to gain resources from versus battles up to 3 times in a 22 hour period, passive resource collection is more important to upgrade and max out. As a bonus, the Gem Mine can be repaired in the Builder Base, which produces 2 to 4.8 gems per day depending on its upgrade level.
For end-game purposes, it is a good idea to keep up with the Builder Base progress, as when you reach Town Hall level 10 and Builder Hall level 9, the O.T.T.O Hut can be fully built after completing 4 objectives, which allows you to have a second builder in the Builder Base, or have an additional builder in the home village. Only one of these can be done at a time, though you can switch between them when O.T.T.O is not working on a building.
Chapter 10: Clan Capital
At Town Hall level 6, you can visit the Clan Capital of your current clan via an airship. This is yet another base similar to the main village, but unlike the main village, the Clan Capital is split into several districts, and each clan member must donate Capital Gold to upgrade buildings. This Capital Gold is acquired during Raid Weekends as you destroy buildings during raids of other clan's Clan Capitals.
The Capital Raids have a similar army capacity system to the home village. There is a different catalog of troops and spells to use in these raids, using a mixture of Super Troops, Builder Base troops, and regular troops, with some being deployed as a horde of troops, such as the Minion Horde and Sneaky Archer horde. The spells also work differently than the home village. They not only persist through your whole attack and the next attack, but the freeze spell can also freeze water to build new pathways in the raid.
Raid Medals can be earned to purchase Magic Items and swabs of resources, but they can also be used to acquire troops in the Clan Castle, which is normally impossible unless you request other clan mates to donate them to you.
Best of luck to your Clash of Clans career! Clash on!
Feedback
If this Strategy Guide contains any inappropriate content, please report it here: Clash of Clans Wiki:Report