
Introduction
Update: This guide is quite outdated now and needs to be revamped with new content. If you are free, please help out. Also, there seems to be quite a few other Strategy Guides with very similar content to this. If you do copy, please at least give credit. This is an original Strategy Guide (inspiration by Flammy). Check out my Dokugan's Strategy Guide/General if you don't think you're 'Advanced' enough.
Dokugan
DokuganWall 07:39,6/7/2013
What 'Advanced' level are you?
This is to clear up the confusion between an 'advanced' player and a starter. Take the quiz:
If you are a Town Hall 7+, level 45+ and completely love Dokugan, then you are considered a high level!
PS. I was joking about the last option.
Extra Walls!
Town Hall 7 Chapter:
Because of an update, players from Town Hall 7 and up got 25 extra walls to use. Some players would like to have them grouped together to protect a certain area where players tend to attack from, where others prefer to spread them out, adding walls here and there and filling in gaps. What would I suggest? Well it depends on the type of base you have. Let me give some examples...
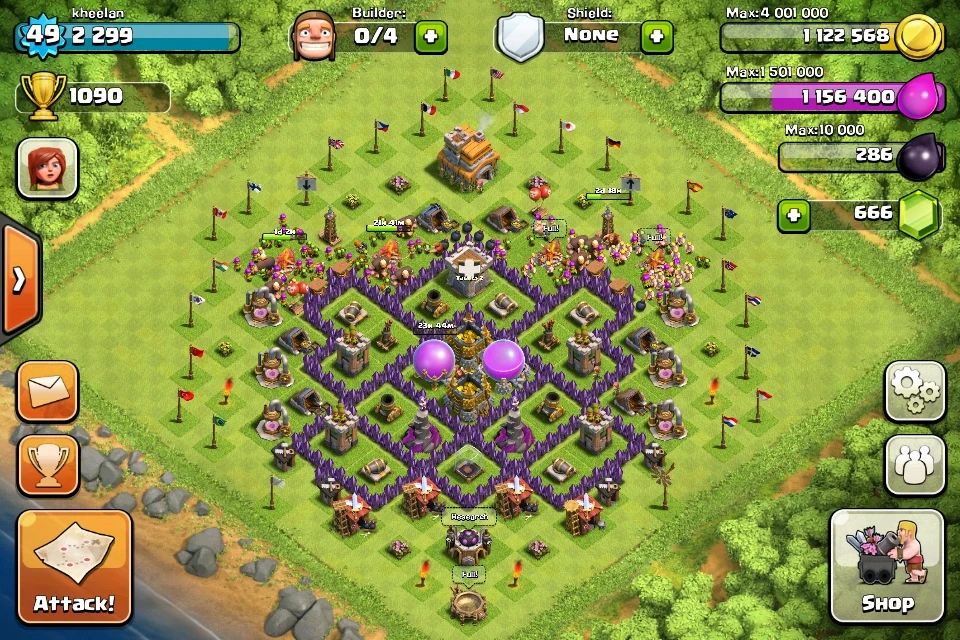
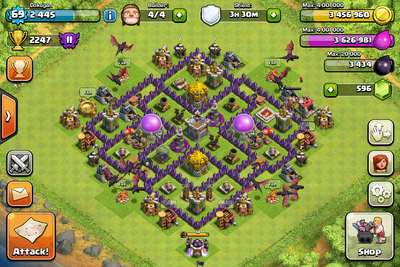
Kheelan's Base
As you can see, the extra 25 walls could be added to cover up the Gold Mines and Elixir Collectors that are on the side of the base. This way, players attacking would have to pact the troops together once they break through, making it easy for the three Mortars to kill them in one shot.
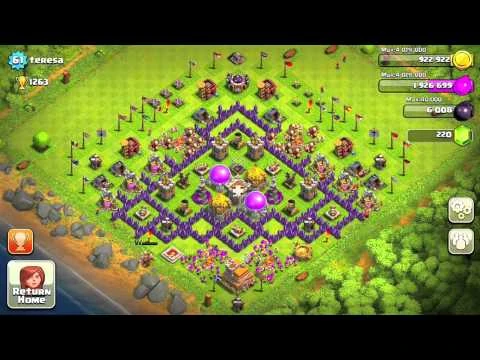
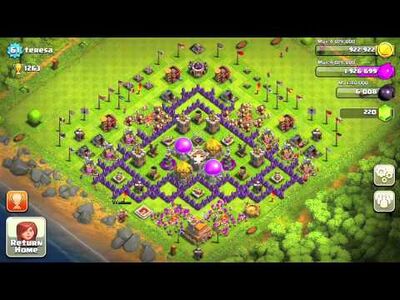
Teresa's Base
This base is rather old (you can tell because of the spiking. This was a strategy that took advantage of the wallbreakers old AI) and is rather neat in its patterns and equality. Anyway, the spiked walls and the extra 25 walls could be used to cover the collectors and mines, like the previous base. Otherwise, it could be used to protect the Barbarian King and the Spell Factory, though that would mean shifting the entire base up a couple of squares, making it extremely inconvenient.
Anyway, those were the examples! I hope I helped in putting those walls to good use!
Alterations of bases
Experienced as you probably are, you would most likely won't want to rearrange your base. This is why the title doesn't say Creating a durable base, but Alterations of bases. Have you done something wrong during your entire time playing Clash, but not know it? Since you most likely already have a durable base,there are maybe some tricks you can pick up/correct below!
Buffering
People buffer by having layers and layers of walls at a certain section of a base. This is incorrect, as Wall Breakers can damage up to three layers of walls. Instead, you should have them leave a gap, then have walls. Let me show you, with some ASCII Art!
What NOT to do:
======================================================================
What TO do:
This way, Wall Breakers will have to be sent in two waves to destroy them, wasting your opponents time and Elixir.
Funneling
Where you usually leave a gap to persuade/force enemy troops to spawn. Very effective when you have enough walls, which Flammy's Town Hall 8 base has:
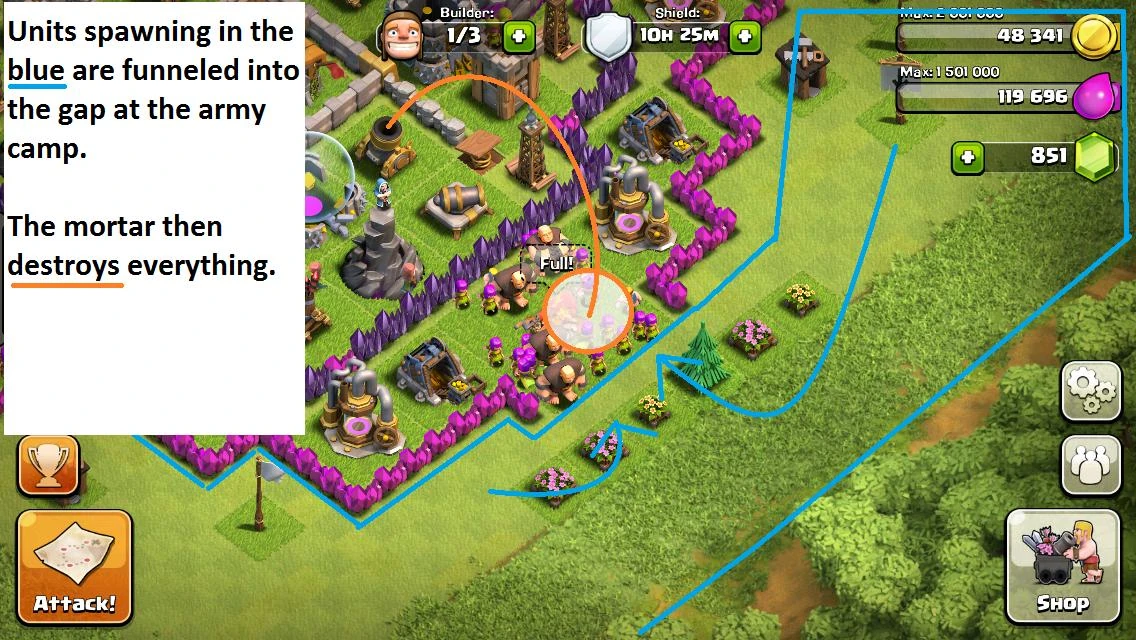
As you can see (not really) all sides of his base have funnel holes (symmetrical to what you CAN see) and troops will have to go there, whether the player likes it or not. The decorations are used for funneling, so troops will have to walk around/between the decorations, (troops can now spawn upon decorations), and will group together at the Army Camp (Giants will head straight for the defenses) and die at the hand of the mighty Mortar. What isn't noted by Flammy, however, is that the Wizard Tower also does the faster splash damage, killing the tankier troops that survive the blast.
Resource Mix-up
This is when you mix up the Collectors and Mines, making it hard for the opponent to give you a victory, but completely destroying a section (usually the Gold Mines) of resources. This is very fustrating, so mix 'em up! Place them where the Barracks, Dark Barracks, Spell Factory and about anything that has a 3x3 spacing. Potential raiders will most likely ignore you because of that. Very effective, especially if you are usually inactive (like me).
Spring Trap Funneling
When you have one gap between sections of walls, there are sometimes small gaps that leave a small hole of precisely one spacing. You could fill it up with a Wall, but tht would be wasting your money doing that. Place a Spring Trap so when the attacking troops come, they will nearly always take out the max amount of troop spacing (15 spaces). Most of the time, it is usually Giants that get Spring Trapped from my previous experience for distraction, and Giants ignore other buildings and head straight for defences, making them lead the raid nearly all the time. Heres a pic:
You can see the Spring Trap Funneling all around this Town Hall level 4 base. Namely- you guessed it! Flammy!
Beware though- a Goblin is faster than a Spring Trap!!
Klan Klan Kastle Killerz
When someone donates archers (or whatever) you need to place them in a place where they are most effective. This may lead to switching around, making it quite annoying. This is why you must ask for the right donation! If your Clan Clastle is in the middle of your base, surrounded with Walls, then you could ask for archers, as they can shoot over walls. Clan Castle Troops are effective distractions and meat shields, especially when there are Giants as they completely ignore them. Tier 3 Troops are rare, but when you do get it, don't put it to waste by making it attack- place it strategicly, where your weakest spot (if you have one) is.
Okay! Next section!
High level raiding
Note: Will only work if you have unlocked Healer/Dragon/P.E.K.K.A and any Dark Elixir Troops. If you read a little more below this chapter, you will find that there are 3 more compositions that are meant for a specific purpose.
These are some high level strategies (which means they are very costly) that I defenitely do not recommend unless you are, of course, high level. Ignore that, if you have a housing space of about 150+ then it's okay- I'm trying to make this guide a little more flexible, you see.
These strategies can be found on the Attack Strategies page. (These strategies have been hand picked and been edited for a heck lot of time).
Elixir and Trophy Hunting 
| Troops Required |
|---|
| 30 Barbarians |
| 30 Archers |
| 9 Giants |
| 1 Dragon |
| 3 Wizard |
| 1 Healer |
| At least 4 Wall Breakers and 1 Healing Spell |
1) Place 1-2 Giants then about 4-6 Wall Breakers to attack the walls. The Giant/s is to distract defences from targeting the Wall Breakers. Place more to break the whole wall if it hasn't been destroyed.
2) Place all 30 Barbarians inside your enemy's wall then place the remaining Giants.
3) Drop a Healing Spell to heal your surrounding troops.
4) Then place all your Archers to surround your enemy's Town Hall.
5) Then deploy your Healer to heal all your troops. Be wary of the Air Defense. Try to use Giants to destroy it.
6) Then place the rest of your Wall Breakers and Wizards into the enemy's Town Hall (if it hasn't already been destroyed).
7) If the job is not done, place the Dragon to take care of the rest.
Archer Demolition/Drag Cleanup
| Troops Required |
|---|
| 2 Dragons |
| 6-10 Wall Breakers |
| Rest - Archers |
1) Place 30-50 archers all around the enemy village (for distraction).
2) Put archers in small, spread out groups to take out defenses in this order - Air Defense/s,Archer Tower/s, Wizard Tower/s (Be careful around the Wizard Tower because of splash damage). If you are using a Dragon, don't worry too much about taking out the Wizard Tower as they are not very effective against Dragons.
3) If you need to break through walls to get to the defenses, use the Wall Breakers.
4) If you have completely taken out the enemy village with the archers, then you don't need to use either of your Dragons. If you haven't, then just put down the Dragon and you should get 100%. Only use the second dragon if you need it.
Notes:-
1) The higher level your troops, the better chance you have of getting 100%.
2) Make sure that the person you are raiding has a fair bit of Elixir so that you don't end up losing it.
4) Using this strategy is not guaranteed to give you 100% all the time, but you should at least get one star most of the time. Rarely however, it might not work and you might not get even 50%.
5) This strategy is mainly for gaining trophies and might not work for resources. Example compositions for different level of players:
| Troops | 6 Example Army | 8 Example Army |
|---|---|---|
| Total Housing Space | 135 | 200 |
| Wall Breakers | 5 | 10 |
| Archers | 115 | 140 |
| Balloon | 2 | 0 |
| Dragons | 0 | 2 |
The reason why Archers are used instead of Barbarians is the fact the can shoot over walls, so you don't have to waste Elixir and time training Wall Breakers. Archers are cheaper than Wizards and faster to train as well, making them the ideal troop.
Healer + Giant Army
| Troops Required |
|---|
| 1 Healer |
| 10-20 Giants |
| 2-6 Wall Breakers |
| Any combination of Barbarians, Archers and Goblins that you prefer for support and clean up. |
The Healer is a flying unit that heals and who are like all Air Units susceptible to Air Defenses. Destroy

defenses with the Giants before deploying the Healer, or at least deploying the Healer in such a way that it will heal the Giants for a long time before it dies to an Air Defense (by eventually coming within range).
The goal of any Healer + Giant attack is to take out the Air Defense. However, sometimes Archer Towers can be just as annoying to Healers. Sometimes your Giants will take out the Air Defense then an Archer Tower will take out the Healer. Healers are very weak and can not defend themselves. The strategy may not work due to well placed Archer Towers, Air Defenses and Wizard Towers.
1. Deploy one Giant and as many Wall Breakers needed to break through the wall.
2. Once the wall is broken, deploy the rest of your Giants to take out the Air Defense.
3. Once the Air Defense is down deploy the Healer and more Wall Breakers if needed if you have Goblins and Barbarians deploy them too at the right time.
This attack should make you get at least 2 stars unless you didn't deploy the troops properly.
Wall Breakers help with this strategy by letting the Giants in. Goblins will also help by stealing resources.
Example compositions for different level of players:
| Troops | Town Hall 6 Example Army | Town Hall 8 Example Army |
|---|---|---|
| Total Army Supply | 135/135 | 200/200 |
| Healers | 1 | 1 |
| Giants | 12 | 18 |
| Wall Breakers | 4 | 4 |
| Archers | 26 | 41 |
| Barbarians | 13 | 21 |
| Goblins | 8 | 16 |
Dragon Rush
Note: Jorge Yao (the first player to reach 4000 trophies) used to use this composition.
The Dragon Rush is one of

the more powerful attack strategies. Due to the Dragon's high health and decent damage, this strategy can work well. Maybe send in about 5 Giants just to draw a little fire away from Dragons. This will get between 1-3 stars, depending on defensive buildings levels.
Use 1 Healer, 5 Wall Breakers, 10 Wizards, 10 Giants, 30 Barbarians and 30 Archers. First, throw two Lightning Spells on the strongest Mortar in the field to destroy it. Second, put one Giant near a wall (be sure to wait for the Mortar to shoot its first bomb shell then release 2 Wall Breakers. When the walls are destroyed, release the rest of the Giants and support them with some Archers; release Wall Breakers if necessary. Third, after most of the Air Defenses gets destroyed put one Healer to refill the Giants' health. When the defenses surrounding the Town Hall or Storages become destroyed and there's a wide open space for the Wizards to enter, place them down to destroy the rest of the inner buildings. If there were any exterior buildings like Barracks, Army Camps, Collectors etc. Use the Barbarians and circularly surround the village.
Dragons and P.E.K.K.A's
Dragons and P.E.K.K.As works really well because both troops have high health and damage. Send in
P.E.K.K.As near Anti-Air defenses (Archer Tower, Wizard Tower, Air Defense), and send in the Dragons near ground defenses (Mortars and Cannons). Be careful for Hidden Teslas and X-Bows because they can ruin your raid quite badly.
Hog Rider Rush
Hog Riders are the perfect replacement because they act just like Barbarians, beside the fact they can jump over walls. One Hog Rider takes up 6 spaces, but one Hog Rider does twice more damage than six Barbarians. Six Barbarians have a total of 135 health, while one Hog Rider has more than twice that at 300 health! Also, high level Mortars might be able to one hit K.O. Barbarians, but Hog Riders would have to be hit multiple times, so hordes survive longer under fire from Mortars and Wizard Towers. Deploy them as near to the Town Hall as possible to get a quick 1 star.
Acid Rain
Note: You need a fair lot of Dark Elixir for this type of composition.
Troops:
| Troops Required |
|---|
| 2 Dragons |
| 80 Minions |
| 4 Lightning Spells |
| 1 Barbarian King/Archer Queen |
| Clan Castle Troops |
Well it's fairly easy, you need to find a suitable opponent to attack. So first thing you do is decide which part you

want to attack first. Once you have decided, use the maybe 2 lightning spells to take out the nearest Air Defense. Then, you place your Dragons, perhaps all of them on the part where the Air Defense is destroyed, if Clan Castle Troops come out, use your remainder of Lightning Spells to take it out. If you don't have any left, then don't worry, Dragons now do splash damage. After, this is important, you must check for Air Bombs. The Dragons will do a good job, just make sure they live. Without taking out the Air Bombs, your Minions will die because of splash damage. Then, if the Dragons have not taken out the outside buildings which is the place you should be deploying Minions, then use donated troops. This is because Minions are stupid, they will attack the nearest thing. Then we can begin, spamming all your Minions at once is probably not the best idea, Air Bombs can destroy entire Minions in one blow. If you think it's safe, then you can use all of them. They are over powered and in swarms will destroy the entire base. The secondary Air Defense will shoot one at a time, the Wizard Tower will depend on its level, best to leave it to Dragons, Archer Towers might take out the Dragons so make sure they take out the Archer Towers. That's all I have. Thanks!
That's enough, don' you think? Maybe another Strategy Guide has more...
Onto the next section~
The Visual and the Mind
Now I'm not going to show you how to raid, but some common (or not) tactics used by players that range from high to low. Such as how to reduce training time, capturing the maximum amount of loot and detecting very annoying glitches. Let's go-
Keep the Barracks/Dark Barracks busy!

A common tactic is to train your army while you search/raid a base. This way, you can save 5 minutes of training time,which can mean a large amounts of troops if you are having trouble finding an ideal base.
Divide troops equally
This way, instead of wasting about 45 minutes training, you can reduce them by maybe ten minutes or so. Many people forget to do this, and may be quite difficult especially if you have unequal level Barracks.
Let your eyes run!

Try to see if the Gold Storages, Elixir Storages, Gold Mines and Elixir Collectors look like they are briming with Gold/Elixir. If they are, then great! All you need to do is devise a strategy to reach the desired place.
And the annoying glitches
Sometimes, you may see a Resource Building that looks empty/full. This may be the case, but at the same time it might not be. Check the overall loot number and use your logic! If you think it is a glitch, then go for it. If you think it isn't... Well then try to attack where most of the loot are.
How about when you are active in battle?
Well...
Check for Clan Castle Troops (duh)
Place down a cheap, single unit such as an Archer and watch. If there are, then it is best to place a few troops there to try to destroy them. Note that if this is not done properly, The Clan Castle Troops will decimate your army in a matter of seconds. Clan Troops should not be ignored.
Use Spells
Usually, Spells such as the Lightning Spell are used to destroy Air Defenses and/or Mortars. You should do that, but also don't forget the other Spells, the Healing Spell,Rage Spell and the Jump Spell! Use them wisely, and you will profit from it.

Conserve your Troops
Don't put an all-out army if you think the base it very easy to defeat. Instead, place the minimum of what you need, and if that's not enough, you can always place a little bit more to ensure a 3 Star victory. Yay~
Clan, Troops and Donations
A majority of people are usually already in a Clan, and have a defaulted donation troop, usually the Archer due to
their cheap cost and ranged attacks. But, for some Clans donating everything is okay (even Wall Breakers!) and this sometimes may lead to fights and grudges against clanmates. Anyway, I'll show what troops are best and not so good for donating and receiving...
Barbarians, Giants, P.E.K.K.As, Hog Riders, Valkyries and GOLEMS!
All of these units are very tanky units, capable of soaking heaps of damage, while dealing a rather great amount themselves. They are best used for distracting enemy troops and letting your Defensive Buildings (especially the Mortar) take care of the rest. Be warned, though, some players are testy when in comes to donating these due to their high cost (I'm not talking about the Barbarians and Giants, don't worry) and usually want something good in return.
Archers and Wizards
The backbone of a good army are these projectile-shooting units. They are very good at cleaning up buildings that other units leave out, and due to their ability to shoot over walls and not engaging in direct combat, they can take down enemy troops when a more powerful troop (such as the Giant) is accompanying them. This is what people usually receive... Make sure to donate these killer troops!
Balloons and Healers
These are troops with fairly large vulnerabilities but also fairly large capabilities. Both are not commonly donated troops, but are sometimes seen when in certain Clans. Healer is the only troop that can heal your buildings, slowing the enemy down and potentially making what is meant to be a 57% turn into a 54%. Balloons, on the other hand go straight at the enemy, killing them with their amazing splash damage. They are sometimes taken down by Archers even before they have arrived, but the final death explosion might kill them.
Dragons and Minions
The more powerful, faster and favoured donation troop are usually these. Unfortunately, when in battle they user must take down several Air Defenses, make sure there are no Air Mines and then send in the air troops, making it rather hard and frustrating. For Clan Troops, though, they can take down both Air Troops and Ground Troops. This will annihilate any badly planned strategies the enemy might have thought of. This is why I mentioned to check for Clan Castle Troops earlier on.
Goblins and Wall Breakers
The worst possible donating troops are these. Wall Breakers will just run towards the nearest troop and blow themselves up (yes yes, very funny) and Goblins are rather weak in both attack and health making them unsuitable to attack. Of course, this doesn't mean you can't donate them. You can send them to your friends as a prank (as long as they aren't Clan Leader or Co-leader) and the reaction (might) be hilarious!
Farming is Trophy Hunting, and vice versa
Why? Well, let us see...
The Guidelines of 'Farming'
- Ignore Trophies.
- Gather Resources.
- Town Hall outside. (not necessarily)
The Guidelines of 'Trophy Hunting'
- Ignore Resources.
- Gather Trophies.
- Town Hall very well protected.
- In extreme cases, Storages are placed outside or very easy to reach and loot.
Now, how is Farming Trophy Hunting? Stop stalling! I hear you ask. Well...
If you put your Town Hall outside, people attack you. Low levels are usually those cowards, looking for the easy win. The thing is, there is a little red button that not many people press~ behold, the amazing REVENGE BUTTON! By putting your Town Hall outside, you get to pair up with potentially weaker, and much more easier to defeat opponents. How about Trophy Hunting?
Well, by putting your Storages outside, your enemy will be FULL of Gold and Elixir. Revenge them! Or, if they have spent it all, wait until they have stocked up on loot. Lightning Spells may be good for this instance. Stay Tuned~ Next chapter, Dark Elixir!
Dark Intelligence
In 2013, a new and rather rare resource for all high levels to collect and steal- Dark Elixir! The invention of Dark Elixir,as I'm sure you know, means that Heroes and Dark Elixir Troops can be unlocked! Many
250
of you, especially the new high levels (just Town Hall 7) want loads of Dark Elixir. Let us begin with the right foundations.
PS. Town Hall 8-10 can leave, this is not for you!
Lightning Spells and their Heavenly Doom
Most players decide that Lightning Spells are best suited for taking down Dark Elixir Storages. This is mostly true, as Dark Elixir is rarely seen with bad protection, unless they get the mightily Hero(s) in all its glory- the Barbarian King!
Out this to memory- Lightning Spells are put to their maximum potential against large amounts of Dark Elixir. Remember to view high-levels that raid you! Remember what I said about the Revenge Button!
Extremely tough Army Compositions
Now here I have created two Army Composition specifically for Dark Elixir raiding. Read on:
Arsenaru
| Units | Capacity |
|---|---|
| Wall Breakers | 1-2 |
| Dragons | 1-2 |
| Healers | 1-2 |
| Giants | 10-20 |
| Remaining Army Capacity: | N/A |
| Barbarians | 50% |
| Archers |
50% |
| Clan Castle Troops | Dragon is recommended |
Remember, this is specifically meant to get through heavy defences to break into the centre of the base. This may be overpowered, so tell me if it is. Method:
1. Deploy Giants/PEKKAs to nearest isolated Air Defense (or closest to Dark Elixir Storage/Drill) and spread them slightly so any splash damaging buildings will not affect some of them. Send one or two Wall Breakers (to weaken walls) and the Giants/PEKKAs will break through with ease. Deploy Healer when Giants are low health.
2. If the Air Defense has not been destroyed yet (or if Healer gets in range of another) destroy the second one. Dual spawn (more on that later) Archers and Barbarians so that they will support the (most likely) dying Giants. Save up about 20 of each Archer and Barbarians and release them at the other side for clean up.
3.When about two or more Air Defenses are destroyed, Deploy all the Dragons at three points where you had deployed your Giants. They will rush towards the rest of the buildings, possibly finishing the rest for you.
4. If you think you are still going to lose the battle/not reach the Dark Elixir, deploy the Clan Castle Troops nearest to the remaining buildings, or destroy the out of range buildings such as any corner Builder's Huts, etc.
I have never tried such a heavy army before, so message me on my Wall if there are any difficulties/trouble.
Alternatively, you could just Lightning Spell it, which could save you a hell lot of time (30 mins).
Doragon
| Units | Capacity |
|---|---|
| Dragons | 3-7 |
| PEKKA | 1-4 |
| Healer | 1-2 |
| Archers and Barbs | 50% |
Less base-smashing as Arsenaru, but when used effectively, will guarantee your pathway to Dark Elixir. This is more suited for Town Hall 7-8.
Method:
1. Deploy all of your PEKKAs and release about 80% of your Archers. Spread them out!
2. Deploy all your Dragons spread out and spawn the Healer(s). Barbarians can be used for clean up, and any remaining Archers.
3. Any Clan Castle Reinforcements can also be used, if your feeling unconfident.
You may be wondering why this isn't up in the 'Army Compositions'. Well, it's because I didn't think of this until now! :p
Efficient Dark Elixir Drills
At Town Hall level 8, all players have the option to purchase a Dark Elixir Drill. Now, the Drilllis actually very slow at producing Dark Elixir so you wouldn't want opponents to raid that from you. Placing of the Drill is important (at least, if you need it) and should usually be placed inside your main part of your base. Short chapter, eh?
Next!
Misleading Troops
This chapter was forgotten in Dokugan's Strategy Guide, but since its complete, I'll post it here! Anyway, I'll be talking to you about Troop AI (there's going to be a separate Guide about this~ Coming Soon!) and how to lead them elsewhere, and how to counter them as well. Let's start!
Barbarians PEKKAs Hog Riders Valkyries
These are the Troops that will target anything that they first see (except maybe for Clan Castle Troops) and they are they best and easiest troops to mislead. If you are semi-protecting your Town Hall, most likely these will avoid them and get mislead. Let me show you how:

As you can see, Any of these troops that are mass deloyed at the bottom at the same time will first head towards the Laboratory, and then split in half and go towards the Army Camps. Then, assuming that both of the groups destroy the Army Camps at the same time, will head towards the Walls and to the Cannon. After that, well, I'm pretty sure by then any surviving troops would head towards either the Barracks or Archer Tower, and keep going from there. Lets hope you know what I'm talking about...
Giants Balloons Golems Goblins
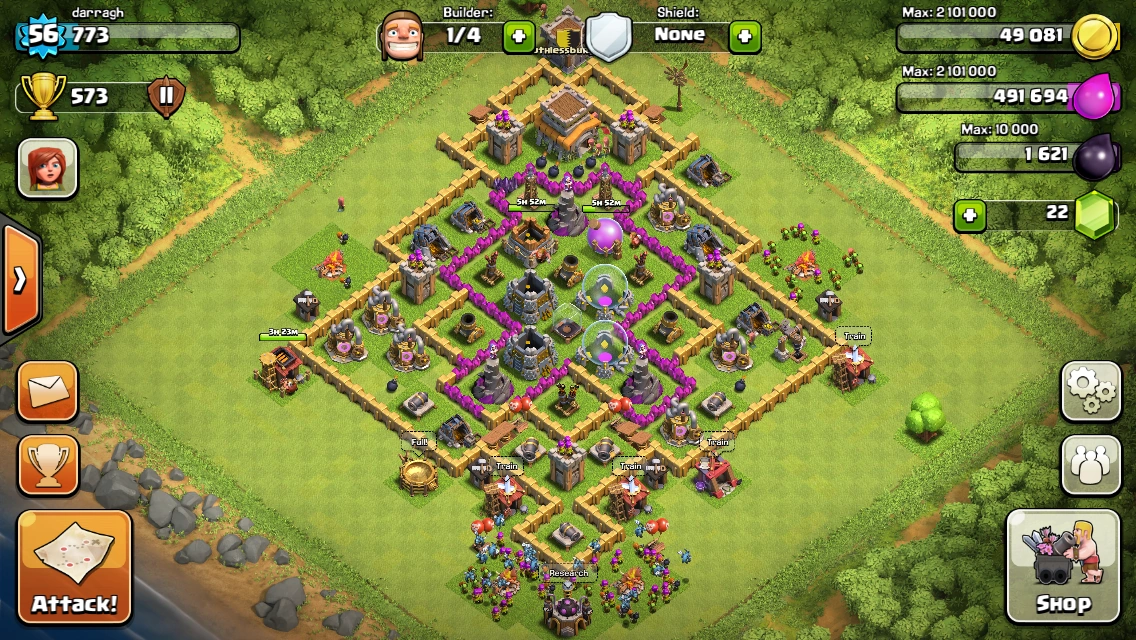
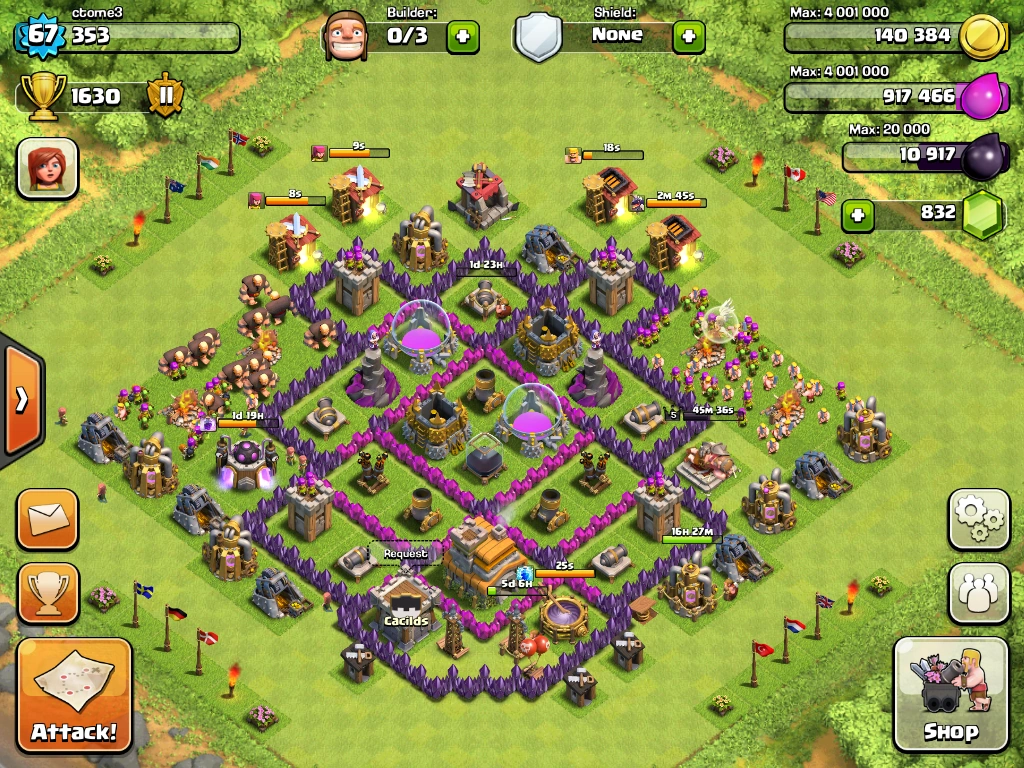
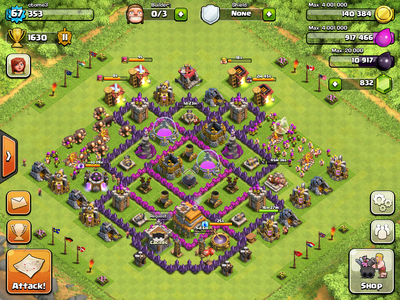
These troops have rather unique AI, that being that they head towards Defenses (with the exception of Goblins) first and ignore everything else. Let us use my base for this example:

Any of these troops deployed at the bottom of this base, will split up to go for either Cannons. From there, they have a strong possibility to ignore the Spring Trap Alley and head straight for the Archer Towers and Cannons over there. Then, either the troops would head for the Air Defenses, etc.
For the Goblins, it will first split up into two groups and head in the general direction-north. Up until they get killed by the Wizard Towers, they are actually quite useless (in my own opinion).
Wizards Archers Minions Dragons
These are ranged units, and fire from a distance. They behave the same as the first type of Troops (melee, any target) and are basically the same thing as them.
Healers
The only type of troop that does not attack in any way, the Healer is a rather unique unit in its own way. It heals the troops that comes nearest to it (which is sometimes very fustrating when you want it to heal a very specific unit such as the Giant) and is useful at aiding other troops.
Wall Breakers
Now, assuming you use an all-out Wall Breaker army there is no need to mislead these troops. But, just in case you actually did have an all-out army of Wall Breakers (maybe to get the achievement) let us see how it would go:
Starting from the bottom, every single Wall would be blown up (or the amount of Wall Breakers successfully survive and blow up as they should) and...yeah.
Keep going!
The 1# Tactic
This covers everything (or nearly everything) those extremely high level players use. This, if you are as high leveled as them, will guarantee a win (The composition below actually two starred Jorge Yao, the first player to reach 4000 trophies and beyond that until he quit. Shall we begin?!
Suparuta
Let us start with this awesome compositon.
Note: You must have every single Army Building maxed out.
| Troops | Capacity |
|---|---|
| Archers | 4 |
| Wizards | 17 |
| P.E.K.K.As | 4 |
| Golems | 1 |
| Barbarian King | 1 |
| Wall Breakers | 9 |
| Archer Queen | 1 |
| Rage Spell | 3 |
| Lightning Spell | 1 |
Method:
1. Deploy the everything at once at the very top of the base. Spam the Rage Spells at the top and the Lightning Spells at nearby defenses.
Simple and easy, probably because the troops are the ones that actually do anything, not strategy.
My Current Layout
For those who are interested. I am currently in Crystal I.
Special Edition: Concept Art
Due to non-strategy-related issues, this page has been moved to my Blog. Check it out !
Conclusion
I have finally decide to conclude this amazing guide that has been at works for a very long time... but not before some information about me!
- I am a level 68!
- I am 13.
- This took about 2 months to create the main part of the Guide. The rest was added on over time ;)
- This was inspired by Flammy, which I earlier on mentioned in my original guide.
- My favorite troop is the Dragon and my favorite Dark Elixir Troop is the Golem!
- My Town Hall is level 7, currently pushing to Masters
- I am clanless.
Thanks you for reading, don't forget to check out my Dokugan's Strategy Guides/General as well!
Dokugan Ryu
DokuganWall 07:39,6/7/2013
Feedback
If this Strategy Guide contains any inappropriate content, please report it here: Clash of Clans Wiki:Report