
Hello, this is J-Rex64. I am just a contributor to the wiki and dedicated to try to make a strategy guide about village layouts. I would like to point out that this is just my strategy when making my village. You may have different strategies or opinions. I would absolutely love to hear your opinions, but in a constructive criticism sense. Also if there are any mistakes in spelling, grammar, or information about the game (and let me assure you, there will be) then feel absolutely free to correct it. I would prefer it if you told me you were doing so first. If you did not feel that my strategy guide helped you, please tell me why. I am completely open to criticism and suggestions/questions. If you took the poll at the bottom and answered no (*Gasp!*) then please message me and tell me why you didn't like my guide. If you do not leave a message for me, I will assume that you didn't give the effort to read all of it or this. Therefore, I will ignore it. I am open to criticism and suggestions (like I said). Now, on to the strategies!
Notes about the guide.
Please read the introduction at the top, I think most people skip that on accident.
This guide is mostly for farmers, as soon as I gain some experience with higher level raids and defenses I will add some articles about those layouts.
Also, this is my first wiki page so I probably don't know how to use all the features.
Design Basics
When I am redesigning my village I try to keep a few things in mind. These few things will help me know how to build my base even though I don't know what it will look like.
Simple Structure
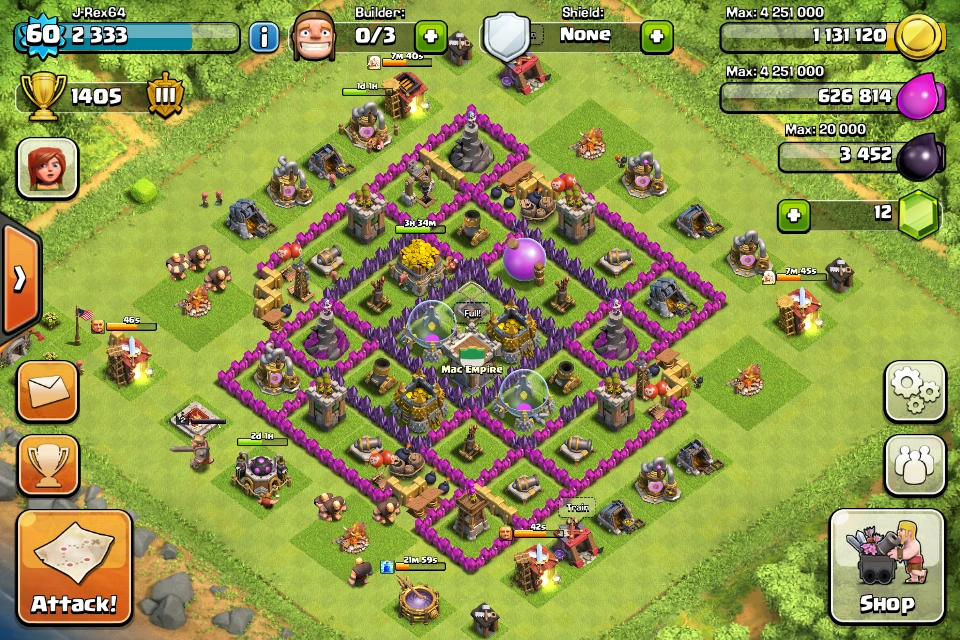
This is my (old) base. Its not only symmetrical, but it has several features built into it. If you want to see my current base, look in my profile.
I keep my most important buildings in the middle, paired up with a strong defensive building. For example, I keep one Elixir Storage, Gold Storage, and my Dark Elixir Storage all in one compartment, but I put my Clan Castle in there too. One thing I like to keep in mind is that you should build your village from the center out. That means that I start by putting important buildings and defenses in the middle, and slowly work my way out. So Mortars and Air Defenses are better towards the middle because of their range, and Cannons and Archer Towers are better on the outside because of their fire rates and hitpoints.
Spacing and Symmetry
Something else I keep in mind when designing my village is spacing. I try to keep my village as compact as possible so that all my defenses cover one another. This also saves Walls, so that the Walls that could have been wasted by spacing out a village can be used to protect another valuable building. Something that helps with space is symmetry. If a base is symmetric then it usually will be very organized and spaced correctly, but sometimes make you to be very predictable.
Saving Space
One last thing to keep in mind is that it is better to put more than one building or defense in one compartment. What I mean by that is that if you put every single building in their own Walls, then you will run out of Walls very quickly. So put a defense in with the storages or put defenses in the same compartment. If one keeps these basic concepts in mind while redesigning, then their base will be harder to crack.
Shape
My base is square, which is one of its few drawbacks. Square bases are easy to attack. Why? Because Wall Breakers are easy to direct. It is better to have the Walls join up in a T formation. All of mine are + formations. This is bad because troops or Wall Breakers can make it into all 4 sections at one time if the center wall is broken. This became a problem so I changed my base. The base in the picture is my old base.
Town Hall
Most people know about this, but some people don't so I will go over this. The Town Hall is the most important building in your base, it is the center of village making. You either protect it with everything, or you just put it where its most convenient for your layout. The Town Hall, when destroyed, is an instant one-star. That means it can make you automatically lose (or win if you are attacking) if it is destroyed. That gives it a lot of power. If you are trying to get a bunch of trophies, then you should put it in the very center of your base (and you should probably find a better guide on base making). If you are trying to protect resources and stay at a comfortable trophy level, you should kick it outside your base or put it on the edge of your walls. When it is taken out, it will give you a free shield, this will help protect your resources for at least 12 hours. Edit: You no longer get a shield unless the attacker deploys one third of what your maximum army is and gets 30% destroyed. I like to keep mine on the very outside of the base, that way there is no obstruction to a free win for the attacker. Some of you may be wondering "But why dont you keep it in anyway, it is a distraction to troops!" That is true, but when you farm, you want them to kill your town hall so you can get the shield and make it as tempting as possible. Some players like to place their Town Hall in range of only a few defenses to try and get the attacker to waste troops in case of a full attack. In my opinion, this is not ideal. A Town Hall "sniper" takes out the town hall because it is very easy and profitable to them. If they see that they will have to work for it, most attackers will skip your base because they do not want to waste their troops. Someone who is willing to take out your Town Hall first does not want to attack the rest of your base most likely. The only good place to put it is in the very corner of your base. Then the attackers will see that it is unprotected and will go for it more often.
Traps and Tricks
When making your base, it is important to make some Traps for your enemy to accidentally fall into. Hidden Teslas, Bombs, and Spring Traps are your best friends when making a base.
Teslas
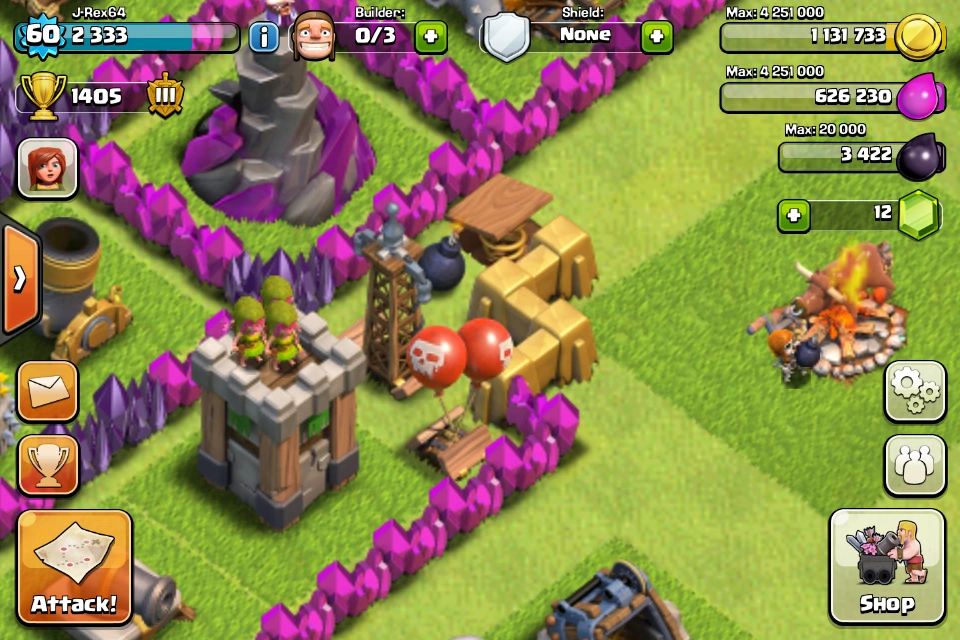
Sample of a tesla trap.
I really hate it when I see someone wall in their Hidden Teslas (unless I am attacking them) because it defeats the point of the Hidden Tesla. Without upgrades, the Hidden Tesla is really weak. Its just as good as a level 7 Cannon with attack and hitpoints. The best advantage it has is that it is hidden. Sometimes, however, someone can sneak a Hidden Tesla in their village Walls and make the attack extremely hard. When I am attacking someone and I see an Air Defense that is unprotected, I immediately go for that Air Defense, but if a Hidden Tesla appears it really messes up my attack by killing all my troops. Hidden Teslas will turn the tables in a defense/attack if they are used correctly. (thanks GeorgeYao)
Other Traps
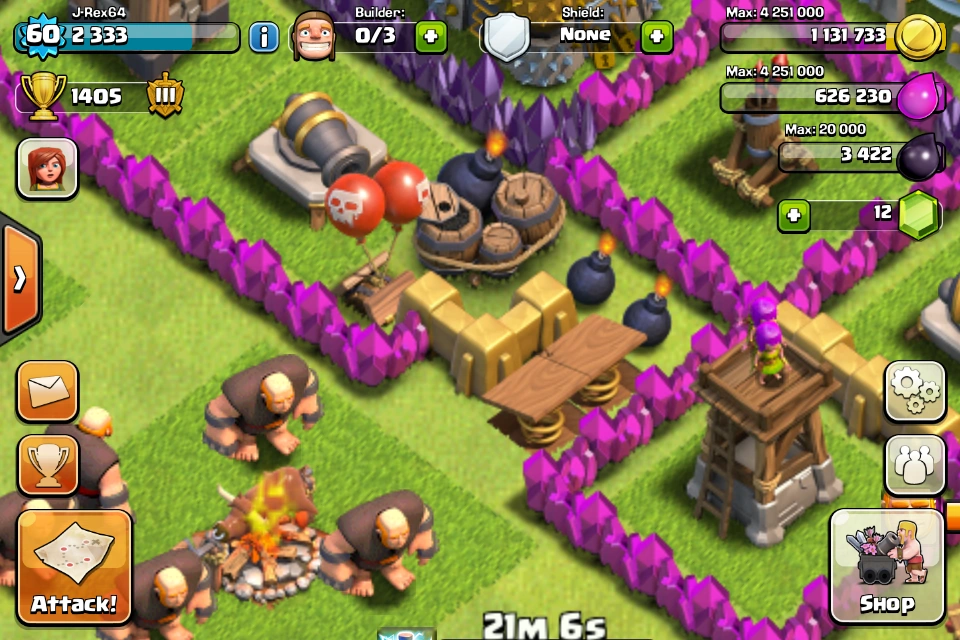
Example of a giant trap.
The other Traps are extremely helpful too. Spring Traps will launch 15 housing space of troops out of the battle. That means 15 Archers or 3 Giants. This is extremely effective if you set them up in spaces in your Walls. The screenshot shows an Archer Tower and a Cannon surrounded by Walls and that has a space with Traps in it. This is a Giant trap... No not a Giant trap like a big trap, it is a trap set up for Giants. The Giants will be attracted to the defenses (and the Hidden Tesla, once it pops up), then they will run over the Spring Traps, being launched out, and then attacked by the defenses all at the same time. This will ruin an attack too, because if someone tries to attack a defense on the inside of my base first, then the Giants will still be attracted to the Cannon and Archer Tower. The best way to use bombs would be to put them in between your outer buildings. This isn't shown in the picture, but it is fairly easy to imagine. Just place the bombs in the middle of gaps in your outside buildings so that when archers, barbarians, or other melee troops that target any building. This means that when they move onto another building they will run over the bomb and blow it up, damaging several troops. Air bombs should be placed where attackers would place a bunch of minions. Air bombs are pretty useless when it comes to anything else other than minions. So place them to an air defense that is easy to destroy or a gap in your air defenses. The best way to find out where to place your traps is to watch replays and find out where you get attacked most.
Pushing Back Spawn Point
This can be both a good thing and a bad thing. Using buildings like Army Camps, and Barracks to push back spawn point does make it where the troops have a longer way to walk to the base, but that also makes them vulnerable to Archers picking them off. If they are too spaced away, they could be completely defenseless! My method is to space it a little, but not too far away. The spawn point is pushed back, but troops can still be attacked while they are attacking the buildings. You may also be thinking that if you are farming, why do you need to care about the buildings? Because they can also distract troops for other defenses to attack. They act like the Giants of an army. They take hits, while the defenses do the damage. I would not spread out building too much, if any at all.
More Advanced Base Design
After you have the basics down, and after you have thought about your Traps, its time to start thinking about what defenses to put where. Everyone knows that it is a good idea to put your Mortars in the middle, but that's not what I mean by what to put where. I'm saying you should put your Air Defenses near your Mortars because Air Defenses are only air and Mortars are only ground.
Defensive Buildings
Wizard Tower
It is a good idea to pair Wizard Towers with Mortars because of Mortars blind spots. Wizard Towers have short range, but their fire rate is good when paired up with Mortar's long range and slow fire rate. When a bunch of Tier 1 troops are swarming the Mortar the Wizard Tower is there to keep them back. When several Archers are shooting down the Wizard Tower then the Mortar is there to destroy them from a distance. Wizard Towers are good when paired up with Air Defense too, because of their splash damage and ability to attack ground troops as well as air troops. If a group of Minions or Balloons is attacking the Air Defense, the Wizard Tower can damage all of them at a time, causing the Air Defense to take each one down quicker. In short,Wizard Towers are good to pair up with pretty much all defenses, so it is a good idea to put them either in between those defenses, or around those defenses like the picture.
Cannons and Archer Towers
Cannons and Archer Towers are effective when paired up with the slow firing Mortar, because of Giants. When Giants are coming to take down the Mortar, the Cannon can watch its back. The Cannon has a fast fire rate, and the Mortar has a very slow fire rate. So the Cannon can attack the Giants quickly while the Mortar can continue to damage every one at the same time. The best way to use these two together is to put a Cannon on the outside of the Mortar's cell. It would also be a good idea to place the Archer Tower down with it too. The Archer Tower not only has a fairly good fire rate, it also can target air troops. So if the Mortar is being swarmed by Minions or Balloons, the Archer Tower and the Air Defense (that should be close by, like I said) can cover it with ease. Cannons and Archer Towers are expendable, so you should also use them in Traps as stated in the previous section. You should also place the Cannons on the edge of your base and the Archer Tower in the corners. The Archer Tower (with its increased range) can cover all the corner buildings while the Cannon (slightly less range) can cover the side buildings with ease. (thanks NoahdaBom2000)
Mortars
Mortars are the extremely valuable, slow firing, devastating defense that is the number one defense that you want to protect. While the stats of a mortar look terrible (the DPS is extremely low, and their hit points aren't too great) this might actually be the best defense one can get. The Mortar's splash damage is its most valuable characteristic, it can devastate a group of Tier 1 troops and, if more than one is firing, it can really wail on a group of Giants. It is commonly known that the Mortar has an extremely large range, at the expense of a blind spot, but most people don't use this to their advantage. I attack people all the time that have their Mortars on the edge of their base, this wastes the range. Put the Mortar(s) in the middle of your base. This will ensure the range will be put to good use and it will be your last line of defense. Another way to use the range well is to place them in a triangle formation. This way, the coverage of the Mortar is equal throughout the base. Like I said before, put it near your Wizard Towers and your Air Defenses. Another good defensive building to keep close by is the Archer Tower. It can target air troops and fire faster, but I already said that.
Air Defense
The Air Defense isn't a very versatile defensive building, but it is very strong. It can only target air troops, so it would be a good idea to pair it up with the Mortar, because it can only target ground troops. Like I said before, pair it up with the Wizard Tower, because the Wizard Tower can not only cover the Air Defense from ground troops, it can provide support with air troops as well. If you put your Cannons around your Air Defense, then they will be guarded by air troops and guard the air defense from ground troops. At Town Hall 8, you should place the three Air Defenses in a triangle formation like the Mortars to provide equal coverage or in a square/rectangular formation at Town Hall 9 or 10.
Clan Castle
The Clan Castle can either be the most useless building in your base, or the absolute most useful building. It all depends on what is in there. Good troops can make a huge different in the attacks. The best troop to donate and receive is Archers, because they are good on defense and offense, they are cheap, and they are quick to make. While Dragons and P.E.K.K.As are the best, it might annoy your clan mates to constantly ask for them. It is a treat to receive one, so keep it until you need it. And the Wizards can do the best job against a horde of Hog Riders.
20 Archers are more distracting than 4 Giants because, all the troops are firing on them at once. Even though the archer is going to be killed instantly, it will still cause the troops to have to switch to the other Archer, then the other, and the other. Switching targets is much more distracting than constant fire on a Giant that has a ton of hitpoints. The Giant may last longer, but it will still be taken out quickly.
Another good clan castle troops is Valkyries. I know Valks have been getting bad publicity, but they are actually useful on defense. This is because of their splash damage and their relative high attack. Their attack is enough to wipe out several Tier 1 troops in seconds. They might be killed quickly, but most of the time they will take out a ton of troops with them.
It's a good idea to put the Clan Castle in the center of your base so that your troops can't be lured out. The Clan Castle has very long range, which means that it may go past the no spawn point, making it vulnerable to luring.
Barbarian King
The Barbarian King is not as useful as you would think. He is easily lured out of a base because of his range and is easily taken down by 10 archers or barbarians because he can only attack one at a time. He does have a lot of hitpoints however. When using the Barbarian King, it would be best to put him either in the very center of the base, if you have space, or on the outside. This is because his range is so big, that if you put him on the edge of the base but still in the walls, he can still be lured out. So he is worthless if he is in the walls but on the edge of the base. If you place him in the center of the base, he can beat up giants and goloms because they only target defenses and the Barbarian King is not a defense technically. It is harder to swarm him with Archers and Barbarians if he is on the inside of the base because the Archers and Barbarians are easily distracted themselves. It would be best to either keep him very centralised or on the outside as a meat shield.


Storages
After you have thought about the defenses, you should start thinking about the actual things you are protecting. The storages are one of the most important buildings you want to protect (Unless you are trophy hunting). If your storages are well protected, then most attackers will pass your base. A good place to place your storages is in the middle, or around the middle. If you want to protect Gold Storage more than Elixir Storage, don't be afraid to put the Elixir Storage in a less protected place than the Gold Storages. If you want to protect Elixir Storage, then don't be afraid to do the same thing with Gold Storage. I usually protect both evenly and then put the Dark Elixir Storage in the middle too. Also, it's a good idea to spread out the storages, because if the enemy can get to one storage, they have to go through the rest of the base to get to the other one (or two). Think about the resource you need to protect and make your base protect that resource as much as possible because without resources you can't upgrade your buildings or train troops.
Feedback
If this Strategy Guide contains any inappropriate content, please report it here: Clash of Clans Wiki:Report