


On this page you can view reviews and strategies on most individual troops and spells.
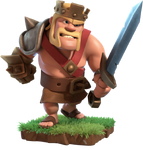
Barbarian

Barbarians are the first unit you unlock in the Barracks. The Barbarian, due to his above average amount of HP per housing space, is a good meat shield. The Barbarian trains very quickly and takes up low housing space, so they are used mostly as meat shields for Wall Breakers, Archers, Goblins and Wizards. If using Barbarians in groups, keep in mind that buildings that do splash damage like Mortars and Wizard Towers can take them out quickly.
Archer

Archers are ranged combat troops, meaning that they attack from a distance and shoot over Walls. They are quite effective solo, but they are also very capable in groups. Archers are commonly used with Dragons or Balloons, or Hog Riders at later levels. At lower levels, some players use Archers with Giants or Barbarians because they, if deployed first, will take on all defensive fire while Archers can shoot behind them. Archers can only shoot at a distance of 3.5 tiles, though, so bear that in mind.
Goblin

Goblins are one of the fastest troops in the game and are currently the only troop whose favorite targets are resources. Goblins are mostly used to farm resources; when farming you will go in with Army Camps full of Goblins along with a small number of Wall Breakers. Especially for lower level players, Goblins are more suitable for farming than for trophy hunting. Goblins, like Giants and other troops that have a particular favorite target, will not attack defending Clan Castle troops unless all of its favorite targets have been destroyed.
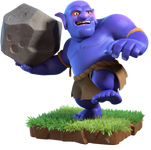
Giant

Giants are the first unit in the game whose AI targets defenses first. Giants are tank-class units who have high amounts of HP, but low DPS. As such, they make good meat shields. They are commonly used to draw fire away from other crucial units such as Wall Breakers, Archers and the like. The only downside to Giants is their poor DPS. Although Giants attack defenses first, they will not fight back against Clan Castle troops until all other defenses are taken out.
Wall Breaker

Wall Breakers are only used to break through walls. Wall Breakers will deal 40x more damage to walls so they are the perfect troop to break through Walls. Wall Breakers are usually deployed after Giants or other high-HP troops that are drawing fire from nearby defenses.
Balloon

Balloons are the first flying unit unlocked in the Barracks and deal area splash damage. When their HP reaches zero, they will crash into the ground and deal a small amount of extra splash damage. In the Single Player Campaign, if you take out all of the air defenses, a single Balloon can destroy the rest of the village and achieve 3 stars. Balloons, like Giants, target defensive structures first. Air Defenses can easily wipe them out; avoiding Wizard Towers is also a good idea for Balloons (especially levels 1-4), due to how they clump together.
Wizard

Wizards are used similarly to Archers as backup troops, but are generally superior (though more costly and time-consuming to train). Wizards have very high damage per second but low HP compared to their housing space and training cost. Wizards, like Archers, can fire over Walls, but can do splash damage, allowing them to clear swarms more quickly. They have a slightly shorter range than Archers, though this difference rarely comes into play.
Healer

The Healer just does that: heal. If you deploy her she will heal ground troops that take damage from defenses and can keep Giants alive for a long time. When using a Healer, make sure you destroy as many Air Defenses first as you can; if she is in range of one, she will be killed in a matter of seconds. Also, other defensive buildings such as Archer Towers or Wizard Towers, as do traps like the Seeking Air Mine, may target the Healer.
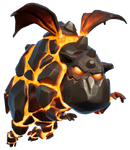
Dragon
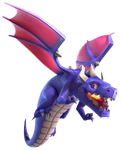
Dragons are a flying unit unlocked in the level 9 Barracks. Dragons are a strong troop, with high HP and high DPS. They also deal small area splash damage, which is prominent when they appear as defending Clan Castle troops. An army consisting of a large number of Dragons can wipe out bases quickly, though they need funnelling to be effective. Dragons are often paired up with Rage Spells to ensure the win.
P.E.K.K.A
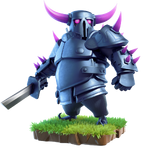
P.E.K.K.A is the tenth troop unlocked in the Barracks. She deals lots of damage and has high hitpoints, but is somewhat slow to attack, so it is advised to be cautious around distractions such as Clan Castle troops and Skeleton Traps. You can deploy her for funneling because of her high health and damage; alternatively she functions well in the core of a base, enabling P.E.K.K.A smash strategies.
Baby Dragon

Baby Dragon is an air troop unlocked with the level 11 Barracks. They have less health and damage than their fully grown counterparts, however they take much less housing space. When not around any other air troops, it will go into a rage, dealing more damage in the process. This effect only persists when they are not surrounded by any other air troops, so it might be useful to bring less air troops to maximize the chances of them getting enraged. When you are farming, you can use full Baby Dragon army.
Miner
Miner is a ground troop that digs underground while traveling from building to building, impervious to any damage or traps in the process. They can dig under walls which allows them to attack structures behind walls without destroying the walls. However, they are not invincible above ground and they may stray off to targets that you don't want them to target!
Electro Dragon

The Electro Dragon is a flying troop that travels slowly and uses a chain lightning attack that can hit up to 5 targets if they are close to one another. It has high damage and health. It is vulnerable to Air Sweepers due to having low movement speed and attacking slowly. Like with regular Dragons, large numbers of Electro Dragons can be effective at destroying a base, especially one with its buildings packed together.
Yeti

The Yeti is a slightly tanky troop taking up moderately high housing space. He spawns Yetimites every 600 points of damage received, which do kamikaze-style attacks. The Yeti himself has no preferred target, while his Yetimites prioritize defensive buildings and deal 4x damage to them. His good amount of hitpoints for his housing space makes it viable to use large numbers of Yetis in a smash attack.
Dragon Rider

The Dragon Rider is a flying troop that has good DPS, hitpoints and range but takes up high housing space. Unlike the organic Dragons before him, he primarily targets defenses; due to his long range, he can be placed behind other Dragons to support them. He also has considerable death damage when he eventually falls, though because of his ranged nature, it can be difficult to use properly.
Electro Titan

The Electro Titan is a ground troop with moderate DPS but very high hitpoints and housing space cost. A major gimmick of the Electro Titan is her electric aura, which deals insuppressable area damage around her, making her excellent in defeating large waves of smaller troops like Skeletons. However, her abilities to attack over Walls is quite limited, as her range is short enough that she cannot directly attack buildings behind them and can only damage them with her aura. As such, she needs support from Wall Breakers and the like in order to effectively enter a base.
Root Rider

The Root Rider is a ground troop with moderate DPS but very high hitpoints for her moderately high housing space cost, that primarily targets defenses. Her root moves along the ground, and she can easily crush any Walls in her way. Not only can she be an excellent tank, her wall-breaking abilities enable her to pave the way for a ground assault.
Minion

Minions are the first dark elixir troop unlocked in the Dark Barracks. The Minion is a flying unit that attacks by spitting blobs of Dark Elixir. It is the one of the two fastest troops in the Home Village, along with the Goblin. The Minion has low hit points compared to other dark elixir troops, but are inexpensive and take less time to train.
Hog Rider

Hog Riders are defense-targeting ground troops that are able to jump over Walls, being the first unit unlockable with this distinction. They deal good damage per second and have middling hitpoints for their relatively low housing space, making them powerful in large packs. Because of the Hog Rider's ability to vault over Walls and thus enter deeper into a base, he is also useful at lower levels to bait out Clan Castle troops.
Valkyrie
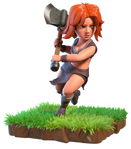
Valkyries are hardy warriors with a double-bladed axe with moderate DPS and hitpoints (the latter gets significantly increased at high levels). They do splash damage by whirling their axes around themselves, so they are very effective in taking out smaller Clan Castle troops or Skeletons from Skeleton Traps; however, their inability to target air limits their potential. Their whirlwind attack can damage multiple buildings at once, and Valkyries will automatically place themselves where they are in range of multiple buildings if possible.
Golem
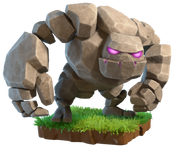
Golems are large, rocklike creatures with extremely high hit points. They are used just like Giants - to absorb fire away from other troops. The Golem, when killed, will split into multiple Golemites (2-4 depending on its level), which can continue tanking in its place. Each Golemite has 1/5 of the Golem's base hit points and damage per second.
Witch

The Witch is a powerful troop that can only be trained with Dark Elixir in the level 5 Dark Barracks. When used, she periodically summons dead troops that appear as Skeletons. In battle, Witches should be used with a meat shield, such as Giants, Golems or other troops with high HP, as they have reasonably low hit points.
Lava Hound
The Lava Hound is an air unit with extremely high hitpoints, but extremely low DPS for their housing space. They are used to absorb fire from anti-air defenses, and its own attack prioritizes Air Defenses specifically. When killed, the Lava Hound will split into multiple Lava Pups, the number dependent on the level of the Lava Hound, starting from 8 at level 1 and increasing as it is upgraded. Lava Pups are similar to Minions, though they have less damage per second, fewer hitpoints and shorter range. Note that like Balloons, Lava Hounds cannot attack other air units (although Lava Pups can).
Bowler
The Bowler is a ground unit that wields a large boulder, that when thrown, will bounce off the ground once and cause splash damage twice in a straight line. While he is useful to cause damage to buildings guarded by Walls or other buildings, he has rather low hit points so it is best to keep him protected by Golems or Giants or other troops with high hit points.
Ice Golem

The Ice Golem is a defense targeting ground unit with moderate hitpoints. His normal attacks do low damage, but apply a frosting effect able to slow down his target's attack speed by 50% for 2 seconds. When defeated, he unleashes a freezing effect that freezes nearby enemy troops and defensive buildings, effectively making him a walking Freeze Spell that can serve as both an excellent support troop on offense and effective Clan Castle defender (although this freeze's effects are reduced when defending).
Headhunter

The Headhunter's major niche is to target and defeat Heroes. Her attacks deal increased damage to them, and slow down both heroes and other troops that happen to be targeted. She is able to hop over Walls to achieve her goals, but has low hitpoints and is liable to be one-shot by the Heroes she targets, so she must be protected by other troops such as a Giant or the Eternal Tome ability to function effectively. It should be noted as the defending Grand Warden is treated as a defensive building, the Headhunter does not prioritise him in statue form.
Apprentice Warden

The Apprentice Warden is a ground troop who has middling damage and hitpoints. Like the Grand Warden from whom he is based on, he prefers a support role, following other troops where possible. His specialisation is his generated Life Aura, which increases the hitpoints of friendly units around him; it works similarly to the Grand Warden's Life Gem ability. The aura makes him an indispensable support for high-hitpoint troops who can gain a lot of hitpoints from this aura.
Super Barbarian

The Super Barbarian is a ground troop boosted from the Barbarian (requiring level 8 or higher). He has high damage, good hitpoints for his housing space of 5 and moves moderately fast. When deployed, he starts off enraged for a few seconds, further boosting his already good damage and speed. Because of their decent bulk and damage, Super Barbarians are useful for cleaning up outer buildings even if they are guarded by defenses, but with sufficient support they can also make significant pushes into the middle of a base.
Super Archer

The Super Archer is a ground troop boosted from the Archer (requiring level 8 or higher). She has middling damage and low hitpoints for her housing space, but makes up for it with really long range and a piercing shot capable of damaging targets very far from where she stands. As a result, Super Archers make up the crux of "Super Archer Blimp" strategies, where a number of Super Archers are loaded into a Battle Blimp and supported with Rage, Clone and Invisibility Spells to destroy large swathes of a base.
Super Giant

The Super Giant is a ground troop boosted from the Giant (requiring level 9 or higher). Boasting about as many hitpoints as two Giants but with slightly lower damage, the Super Giant boasts a superior wall-breaking ability, dealing 5x damage to Walls. This makes him more self-sufficient in theory without needing the support of Wall Breakers, but wall-breaking support is still useful for him as he is still liable to being funneled through intentional wall gaps. As an aside, Super Giants are less vulnerable to splash damage than regular Giants, as they count as one less target than the equivalent of two Giants.
Sneaky Goblin

The Sneaky Goblin is a ground troop boosted from the Goblin (requiring level 7 or higher). With a housing space of 3, it deals less damage and has lower hitpoints than three Goblins combined, but makes up for this deficit with its ability to remain invisible for five seconds after being deployed. Its obvious applications are to be used for farming, being able to more easily reach and damage resource buildings, but they can also snipe a guarded Town Hall if assisted by a Siege Machine to deploy them near one. Traps remain an issue, however, as they can affect Sneaky Goblins under their invisibility.
Super Wall Breaker

The Super Wall Breaker is a ground troop boosted from the Wall Breaker (requiring level 7 or higher). Its bomb, tied to death damage, will destroy Walls of equivalent level as long as it reaches the Wall. This, in addition to having more hitpoints and a slightly faster movement speed, makes Super Wall Breakers very reliable for breaking open wall compartments compared to multiple Wall Breakers, although it generally costs more housing space to use.
Rocket Balloon

The Rocket Balloon is an air troop boosted from the Balloon (requiring level 8 or higher). When deployed, the Rocket Balloon starts the battle with a Haste Spell-like effect, granting it substantially increased movement speed for four seconds. This allows them to quickly rush opposing defenses, as opposed to simply using a Haste Spell to speed up regular Balloons. The Rocket Balloon also sports higher death damage than regular Balloons, allowing them more favorable interactions with certain defenses.
Super Wizard

The Super Wizard is a ground troop boosted from the Wizard (requiring level 9 or higher); he has moderate DPS and low hitpoints for his housing space. His attacks comprise chain lightning that branches out from the initial target, allowing him to damage several targets nearby the initial one. Similar to Super Archers, Super Wizards can be used in "Super Wizard Blimp" (colloquially known as "Blizzard") strategies to clear out large areas, because of the nature of their attacks.
Super Dragon

The Super Dragon is an aerial unit boosted from the Dragon (requiring level 7 or higher), boasting very high DPS and hitpoints but also a massive housing space cost of 40. He attacks with streams of flames, which deal high burst damage in an area around his target. Similar to Dragons and Electro Dragons, Super Dragons can be used in packs to take down enemy bases, and like them, requires funnelling to work effectively.
Inferno Dragon

The Inferno Dragon is an aerial unit boosted from the Baby Dragon (requiring level 6 or higher). It attacks with inferno beams that build up damage over time, similar to a single-target Inferno Tower. This damage scaling allows it to quickly destroy high-hitpoint buildings and defeat opposing Heroes. However, its hitpoints are mediocre for an air troop and it can be disrupted by Air Sweepers or if its target (if a troop or Hero) moves away from it, so Freeze Spells should be used in support to prevent these scenarios.
Super Miner

The Super Miner is a ground troop boosted from the Miner (requiring level 7 or higher). Super Miners burrow underground like normal Miners, and are capable of going under Walls as Miners do, but do increasing damage over time (though not scaling as extremely as the Inferno Dragon). He also carries an explosive that does significant damage to buildings and ground units upon his defeat. Although not as capable in combat as four Miners (which take up the same amount of housing space as he does), he is significantly more durable and less suspectible to splash damage from defenses like Scattershots.
Super Minion

The Super Minion is an air troop boosted from the Minion (requiring level 8 or higher). Boasting decent DPS and moderate hitpoints, the Super Minion has comparable combat capabilities to a Baby Dragon, but does not need to be enraged to see its potential. Additionally, for its first few attacks (6 on offense, 3 on defense), it can fire from very long range, capable of outranging short-range defenses like Wizard Towers, or when defending, attack almost immediately after appearing from the Clan Castle. This makes them formidable for sniping buildings and enemy troops alike.
Super Hog Rider

The Super Hog Rider is a ground troop boosted from the Hog Rider (requiring level 10 or higher). Like the standard Hog Rider, the Super Hog Rider is a defense-targeting troop capable of jumping over Walls; when defeated, the Super Hog Rider splits into a Super Hog (which continues to go after defenses and can still vault over Walls) and a Super Rider (which has no preferred target but has higher damage). Groups of Super Hog Riders are able to clean up after themselves, and can be complemented with regular Hog Riders for a strong attack.
Super Valkyrie

The Super Valkyrie is a ground troop boosted from the Valkyrie (requiring level 7 or higher). She behaves like regular Valkyries in attack, attacking with spinning slashes from her axe to do splash damage around her. Although not much more damaging or durable than a single Valkyrie, when defeated, she drops a Rage Spell-like effect where she fell, allowing other units to benefit from the resulting damage boost. As her Rage Spell's effects are more valuable deep into a base, she is reliant on funneling to ensure her spell lands in a good location. However, since she cannot drop her spell on command, using her effectively can prove challenging.
Super Witch

The Super Witch is a ground troop boosted from the Witch (requiring level 5 or higher). Instead of spawning many smaller Skeletons like normal Witches do, the Super Witch spawns a single, large Skeleton known as the Big Boy, which has considerable damage and hitpoints. The Super Witch and her Big Boy are much less vulnerable to splash and multi-targeting defenses than Witches and their Skeletons, but conversely more suspectible to strong single-target damage.
Ice Hound

The Ice Hound is an air troop boosted from the Lava Hound (requiring level 5 or higher); it boasts a higher HP than normal Lava Hounds, but takes up more housing space. Combining aspects of the Lava Hound and Ice Golem, it targets Air Defenses first, and can slow down defenses it hits; upon death, it freezes the surroundings and releases a number of Ice Pups which all have the same frosting capabilities of the Ice Hound. However, it should be noted that the freeze duration isn't nearly as long as that of the Ice Golem, nor does it release as many Ice Pups as Lava Hounds release Lava Pups, meaning it isn't strictly superior to either one.
Super Bowler

The Super Bowler is a ground troop boosted from the Bowler (requiring level 4 or higher). He has mediocre damage and hitpoints for his housing space cost, however, his boulders are able to hit three times (compared to the two from normal Bowlers). This enables him to tackle deeper areas of a base than normal Bowlers can. Owing to being significantly more durable than Super Archers (which have similar range), he can be used in smash attacks to tackle the core of a base.
Barbarian King
The Barbarian King is the toughest of Barbarians. He is unlocked at Town Hall level 7, and can be upgraded to level 95, using Dark Elixir. His high hit-points make him a particularly good tank, as it can have more than a Golem once upgraded enough. His abilities provided by his Hero Equipment put him in a variety of offensive roles, such as greatly increasing his damage, summoning a large number of Barbarians to help him, or creating an earthquake to greatly damage his surroundings.
Archer Queen

The Archer Queen is the second hero available at Town Hall level 9; she can also be upgraded to level 95 using Dark Elixir. The Archer Queen boasts significantly lower hitpoints than the Barbarian King, but has high damage per second and great range. She should be placed so she isn't immediately in the line of fire, so use a meat shield for full advantage. Her abilities given by her Hero Equipment grant her boosts to her offense, such as increasing her already high damage while turning invisible, or spawning Archers or Healers for support. She is especially dangerous when combined with Healers, which make up for her low HP.
Grand Warden

The Grand Warden is the third hero and is available at Town Hall level 11. Unlike the Barbarian King and Archer Queen, he only has 70 levels, is upgraded with Elixir, and you can choose if you want him to be a ground or air troop. The Grand Warden is able to support troops with various Hero Equipment, such as a passive Life Gem to increase the hit-points of all troops around him, or making them invincible momentarily using his Eternal Tome ability. His range of 7 tiles is longer than that of the Archer Queen; despite this, he himself deals low amounts of damage and is relatively fragile, thus a meat shield is recommended to maximize his survivability. Uniquely among Heroes, he defends by turning into a statue, which functions as a defensive building.
Royal Champion

The Royal Champion is the 4th home village hero and is available at Town Hall 13. She has only 45 levels and is upgraded with Dark Elixir. She can vault over Walls and prioritises defenses (though she can switch her focus to defending troops if they attack near her). Her abilities from her Hero Equipment make her more potent at destroying defenses, such as the Seeking Shield which targets and greatly damages multiple defenses, the Hog Rider Puppet which summons a number of Hog Riders to help her out, or the Haste Vial which greatly boosts her attack speed. Being a ranged Hero with moderate hitpoints, she could still use the help of meat shields to boost her survivability as she is often directly engaging enemy defenses.
Lightning Spell
The Lightning Spell is the first spell unlocked in the Spell Factory; it damages an area with a single lightning bolt. The Lightning Spell is mostly used in massed numbers to take out crucial defenses, such as Air Defenses, Mortars or Wizard Towers. It is also commonly used to destroy troops coming out of the Clan Castle. Due to its ability to stun a tower for a very small period of time, it can also be used to reset Inferno Towers. It also only takes 1 housing space of spells, meaning you can take a large amount with you.
Healing Spell

The Healing Spell is the second spell unlocked. Healing spells create an area where troops inside are healed; they are often used to support valuable troops such as Giants, Balloons or Hog Riders. They are best used to cancel out damage caused by area-of-effect attacks, such as splash damage attacks from Wizard Towers, or when a Giant Bomb or Bomb Tower explodes. When used on Heroes, the Healing Spell's effects are reduced, making them less effective sources of healing.
Rage Spell

The Rage Spell creates a ring of rage, in which troops are made faster and stronger. Rage Spells are often used for slow and/or high-HP troops, as the spell will enhance the stats of the troops significantly. They can also be dropped on high-damage troops like P.E.K.K.As, who see the best damage boosts from the spell. It should be noted that the effects of the spell are reduced on Heroes, and that the Rage Spell cannot affect attack speed (meaning troops don't attack any faster).
Jump Spell

The Jump Spell is used to enable ground troops within the spell radius to jump over Walls. They can be used as an alternative to Wall Breakers, to allow a ground army to enter one or more valuable compartments. Higher levels of Jump Spell increase its duration; high-level Jump Spells last for a significant portion of an attack, usually much longer than is needed practically.
Freeze Spell
The Freeze Spell is used to freeze enemy Troops and Defenses for several seconds to either allow the player's troops to destroy them or to move out of range. The Freeze Spell can be used to neutralise powerful defenses which could counter the player's army, such as Inferno Towers, the Eagle Artillery or Scattershots. Upgraded Freeze Spells last for longer. The spell takes up only 1 housing space, making it useful to fill empty space.
Clone Spell

The Clone Spell is used to clone any troops that enter its area of effect, up to a certain limit of housing space. It can be utilized to clone large units such as Golems, P.E.K.K.As or Lava Hounds, but note that these clones only last a limited time even if defenses can't destroy them beforehand! It also takes 3 housing space worth of spells, more than other Elixir spells, so it is definitely recommended to use these sparingly.
Invisibility Spell

The Invisibility Spell turns all defensive and offensive units with the exception of Walls and Siege Machines within a 4 tile radius invisible. Invisible units cannot be targeted directly, but are still affected by Spells, Traps and indirect hits, such as splash damage. It is great for funneling because invisible buildings will not be attacked. It can also be used to protect troops that are attacking a target. It also only takes 1 housing space, allowing for multiple of these if you wish to do so.
Recall Spell

The Recall Spell allows an attacker to capture a sizable portion of their army and redeploy them elsewhere. Heroes and Pets can also be called back in this way, but Siege Machines cannot. This utility can be useful in numerous scenarios, such as enabling a funnelling squad to funnel two different sides, or to prevent a Town Hall kill squad from straying off to the side of a base. Upgrading the spell increases the housing space that can be called back.
Poison Spell
The Poison Spell is the first spell unlocked in the Dark Spell Factory. It is used to both damage and slow down enemy troops, and is very effective in doing so, killing low health troops with ease such as Archers, Wizards and even Witches. It can also be used to damage higher-health troops and Heroes as well, though it will not damage Buildings in any way.
Earthquake Spell

The Earthquake Spell is used to generate an earthquake on the targeted location, damaging Buildings and Walls within its area of effect. Damage is percentage-based, and each successive Earthquake Spell will cause less damage to the same building (but increasing damage to the same wall). Four Earthquake Spells of any level is enough to completely destroy any level of Walls. It is often paired with Lightning Spells to destroy high-hitpoint buildings, as the percentage-based damage of one Earthquake can often exceed the damage of a single Lightning Spell.
Haste Spell
The Haste Spell is used to speed up troops, both ground and air. It gives them a greater speed boost than that of Rage Spells, though they do not increase the troop's damage. It takes up half the space of a Rage Spell so it can be considered a replacement to the Rage Spell if the extra damage is not needed.
Skeleton Spell
The Skeleton Spell summons Skeletons to distract enemy defenses. While they won't last very long at all, it can serve as a viable distraction if used correctly. Be careful not to drop them on top of splash defenses, as they will be annihilated before any good use can come out of it! Do note that skeletons are not able to trigger Traps or the Clan Castle, and deal less damage to Resource Buildings and the Town Hall, so farming/trophy pushing with a bunch of these is ineffective.
Bat Spell

The Bat Spell summons Bats to distract enemy defenses. As an aerial equivalent of Skeletons that target defenses, Bats can be summoned en masse with multiple Bat Spells to overwhelm single-target defenses, though they are extremely vulnerable to multi-targeting defenses and splash defenses like Wizard Towers. Like skeletons from the Skeleton Spell, bats cannot trigger traps or the Clan Castle, and their damage to resource buildings is significantly reduced, in particular making it hard to snipe Town Halls with them.
Overgrowth Spell

The Overgrowth Spell traps a large area of buildings under roots for a significant duration, suppressing them but also making them impervious to attack. Attacking units treat buildings under the overgrowth as invisible, meaning they will not be targeted. The spell does not affect defending troops, Heroes or Traps. It can be used as a wide-AoE Freeze Spell to disable core defenses such as the Eagle Artillery for an extended period of time, or as a funnelling tool to have attacking units focus their efforts to the center of a base as opposed to the sides.
Wall Wrecker

The Wall Wrecker is the first Siege Machine unlocked. When deployed, it moves towards the Town Hall as a ground unit, battering through any Walls and buildings in its way; once destroyed, it drops the player's Clan Castle reinforcements where it fell. Although its function is rather basic and unremarkable compared to other Siege Machines, it is sturdy and its wall-breaking abilities can assist a ground army in pushing towards the center of a base.
Battle Blimp

The Battle Blimp is the second Siege Machine unlocked. When deployed, it flies towards the Town Hall at rather high speed. If it manages to reach the Town Hall or is shot down along the way, it explodes with high death damage. It does fairly low damage with the bombs it drops while it moves, but its nature of beelining towards the Town Hall makes it ideal for carrying Clan Castle troops to a particular point in a base. It is not very sturdy, however, and its path can be disrupted by Air Sweepers, so it should be supported by tanking troops and spells to negate its obstacles.
Stone Slammer

The Stone Slammer is a flying Siege Machine, the third one unlocked. It essentially acts as a massive Balloon, preferring to target defenses by dropping boulders on top of them. Its boulders do splash damage in a significant area, particularly effective against Walls. It can support an air attack with its high damage and hitpoints, but its wall-breaking utility should not be discounted for ground armies, even if it is more exposed during a ground attack.
Siege Barracks

The Siege Barracks is the fourth Siege Machine unlocked. When deployed, it does not move at all, but instead spawns a significant number of P.E.K.K.As and Wizards from its openings, followed by the player's Clan Castle reinforcements. These troops can assist in funnelling or clearing compartments, though some support may be needed to ensure they can be used effectively. In particular, the Wizards may be vulnerable to multi-target Inferno Towers or Scattershots, so these should be avoided.
Log Launcher

The Log Launcher is a grounded Siege Machine. Like the Wall Wrecker, it moves towards the Town Hall, though at a much slower pace. As its name suggests, it throws rolling logs, which can damage buildings and Walls at very long distances, being 4x effective against the latter. This makes it very capable of cleaving a path to the center of a base. It does have a limited lifetime of about 30 seconds, however, and its logs can prematurely activate the Town Hall's weapon, so its barrages of logs have a trade-off over using the Wall Wrecker.
Flame Flinger

The Flame Flinger is a ground Siege Machine. A catapult, it launches Fire Spirits to defenses over very long distances, enough to outrange even mid-range defenses like Archer Towers. These Fire Spirit projectiles create damage-over-time effects that slowly wear down defenses and Walls. Its ability to outrange most defenses and its long-lasting lifetime makes it effective to clear entire areas of a base by itself, but it is fragile and easily destroyed by those defenses that can reach it.
Battle Drill

The Battle Drill is a ground Siege Machine. It burrows underground to target defenses; when surfacing, it stuns defenses around it and also destroys any Walls it touches. This makes it a good support Siege Machine for ground attacks. Depending on the placement of defenses, its wall-breaking abilities may not necessarily provide ideal results for ground attacks, so other means of overcoming Walls to reach the center of a base may be needed.
Feedback
If this Strategy Guide contains any inappropriate content, please report it here: Clash of Clans Wiki:Report