
Flammy's Strategy Guides: Table of Contents
|
Topic |
Information |
|---|---|
|
A guide for those brand-new to Clash of Clans, focusing on the first three days while under newbie protection. How to start your Clan off on the right foot with optimal efficiency. Frequently Asked Newbie Questions are included along with their answers. | |
|
Basic elements of strategy and good base design. Rules of thumb for designing your first base. | |
|
Advanced base design elements. Common base archetypes. Exploiting pathfinding and AI elements, | |
|
Chapter 4 Unit Strengths, AI, and Pathfinding Guide |
Critical before moving onto more advanced attacking is the knowledge of which unit to use, when, and how it will react. This guide covers how to use units most effectively; how they move, and why they act. This chapter goes from the basics to advanced material. |
|
Understanding the matchmaking system, both how it works and why it matters. Learn its flaws and exploit them. | |
|
Benefits of raiding, ideal raid, limits, restrictions, and details relating to the fine art of stealing resources. Common army compositions and Risk vs Reward. Flammy's version of Farming. |
Welcome
This page is part of Flammy's Strategy Guides. Check it out for links to my other guides as well as notes about editing and reproducing my content. I also produce Clash of Clans videos on YouTube, including a Let's Play (basically a playthough) starting at Town Hall level 4, so if you're looking for more help and advice, I hope to see you over there.
Unit Strengths
Each unit has its own strengths and weaknesses. The main factors to consider are Combat type (range/melee), Movement type (Air/Ground), Favorite Target (Any, Defenses, Resources, Walls), Damage per Second, Housing Space, and Cost to train. To a lesser degree, you should be aware of each unit’s training time, movement speed. You can see the details of all units (not just unlocked ones) by clicking the “i” symbol on each unit in the barracks.
Here is a very high level summary of each unit. Any special abilities or quirks will be mentioned in the in-depth section below.
| Unit | Strengths, Weakenesses and Notes |
|---|---|
| Barbarian | Good amount of hitpoints, good damage per second, cheap cost |
| Archer | Best range, medium hitpoints, medium damage per second, medium cost |
| Goblin | Great damage per second, especially against resources, great speed, cheap cost |
| Giant | Great amount of hitpoints, Great specialty unit (for targeting defenses), slow movement, medium to high cost, high housing space (5), fast to train (2m for 5 housing space) |
| Wall Breaker | Low amount of hitpoints, excellent specialty unit (vs walls), very high cost (most expensive troop per housing space), slow to train (2m) |
| Balloon | Medium to low amount of hitpoints, air unit, great specialty unit (for targeting defenses, cannot be hit by ground defenses), high damage, very slow to train (8m), high housing supply (5), slow movement, very vulnerable to air defense, extremely vulnerable to archer and wizard clan castle units. |
| Wizard | Low amount of hitpoints, very high damage per second, good range, low housing space (4 for a very strong unit), medium cost, slow unit to train (8m). |
| Healer | Medium amount of hitpoints, fast healing of your own troops and buildings (splash healing), flying unit, low cost (7000 for 14 housing spaces), medium to slow to train (15m for 14 housing spaces), medium to high amount of housing spaces (14), very vulnerable to air defense, extremely vulnerable to archer and wizard clan castle units. |
| Dragon | High amount of hitpoints, high damage per second, medium to high cost, high housing space (20), slow to train (30m), flying unit. |
| P.E.K.K.A | Very high amount of hitpoints, very high damage per second, high cost, High housing space (25), very slow to train (45m) |
Damage Types Comparison
| Single Target | Splash Damage | Splash Heal | Air Targets | |
|---|---|---|---|---|
| Barbarian | X | |||
| Archer | X | X | ||
| Goblin | X | |||
| Giant | X | |||
| Wall Breaker | X | |||
| Balloon | X | |||
| Wizard | X | X | X | |
| Healer | X | |||
| Dragon | X | X | X | |
| P.E.K.K.A | X |
Comparison of Unit Cost, Training Time, DPS, and Health, per 100 supply of units (Thanks again to Hult - really is a good guy! ) Note: tried to embed info graphic, may have to convert it to a table
Balloons - Target: Defenses
I’m starting with Balloons because they are the simplest to understand. Because they target defenses and fly (ignoring walls and other obstacles) their path is very easy to predict. All there is to know is that after being placed, they will attack the nearest defensive structure. Once that defense is dead, they will go to the next nearest. Now lets turn that knowledge into practice. This means that you can completely ignore walls, resource buildings, army camps, etc. etc. etc. ONLY look at what the closest defensive structure is (Cannon, Mortar, Archer Tower, Air Defense, Wizard Tower, X-Bow, Tesla) when trying to predict what the Balloon will do.
Balloons also do splash damage, but it isn’t of any tactical value. Sometimes it will destroy walls or damage nearby buildings depending on their placement over their target.
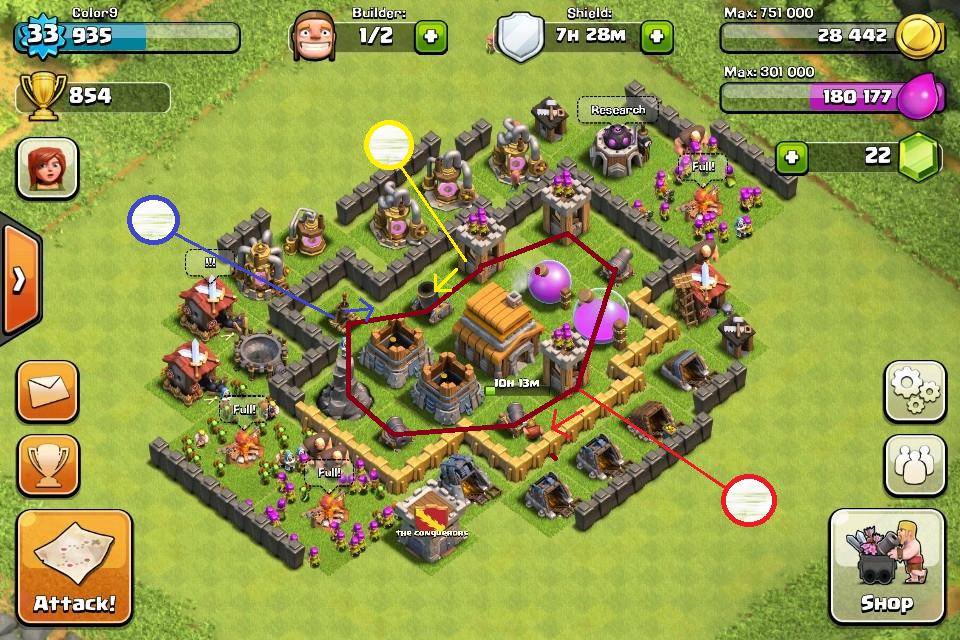
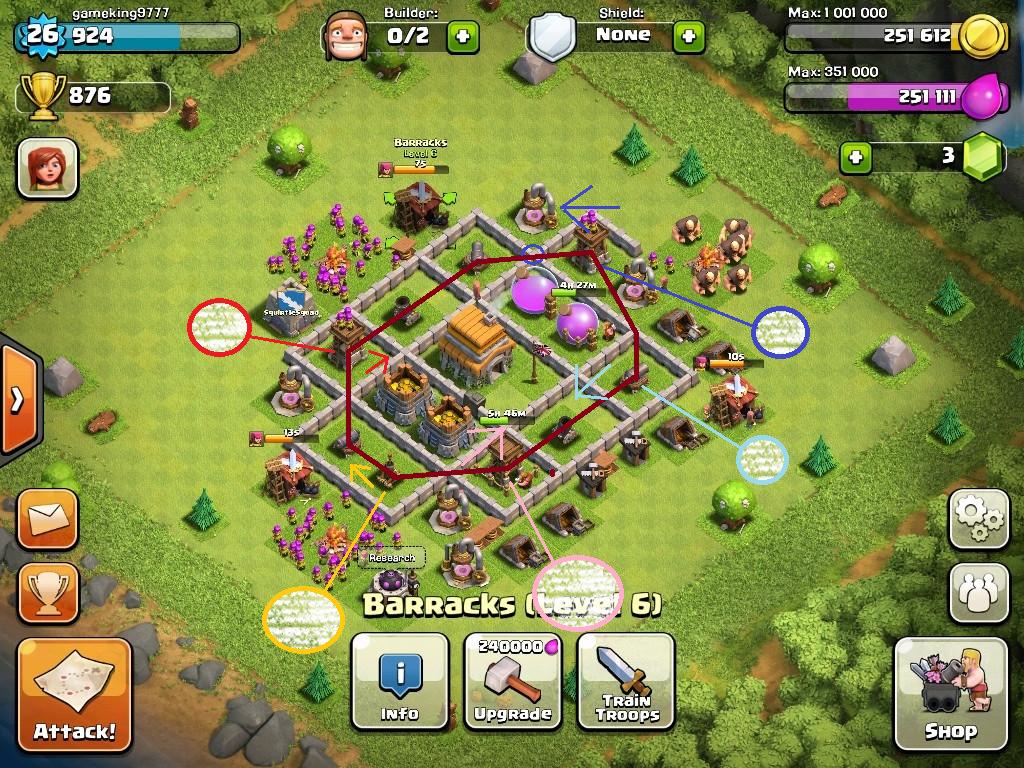
Some bases are very simple to predict because there is always a “next closest” tower that is very easily identifiable. Here is an example base that is moderately easy to predict where the balloons are going to go. The circles are the spawn points, and the balloons will follow the burgundy path in the indicated direction due to the next closest being where it is.
But this gets more complicated in some bases. Here is a method of practice/testing yourself.
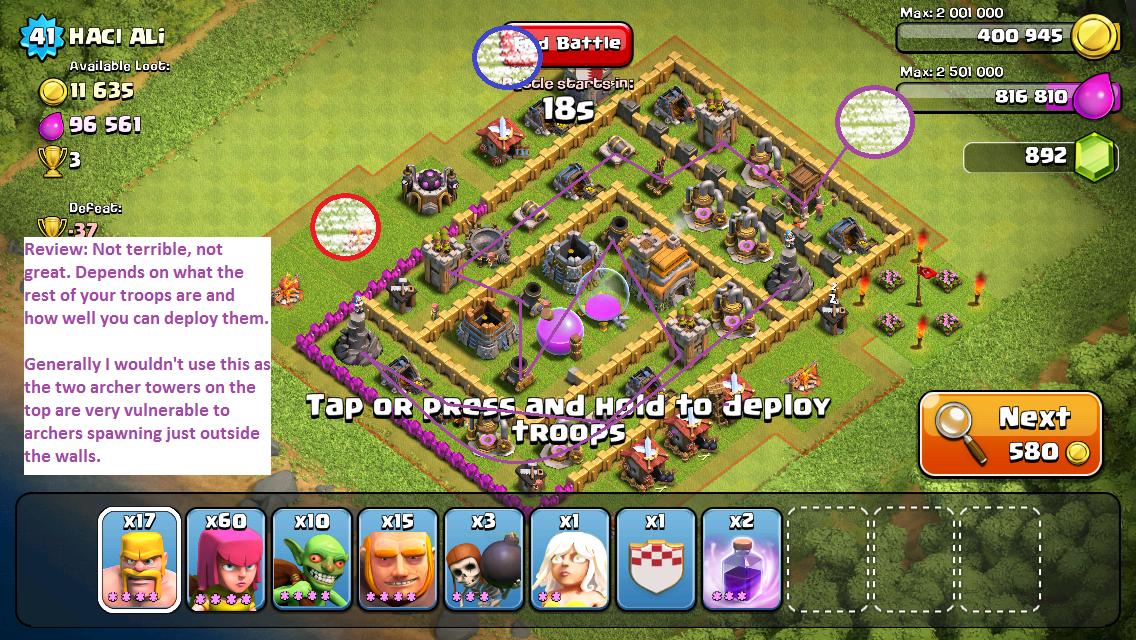
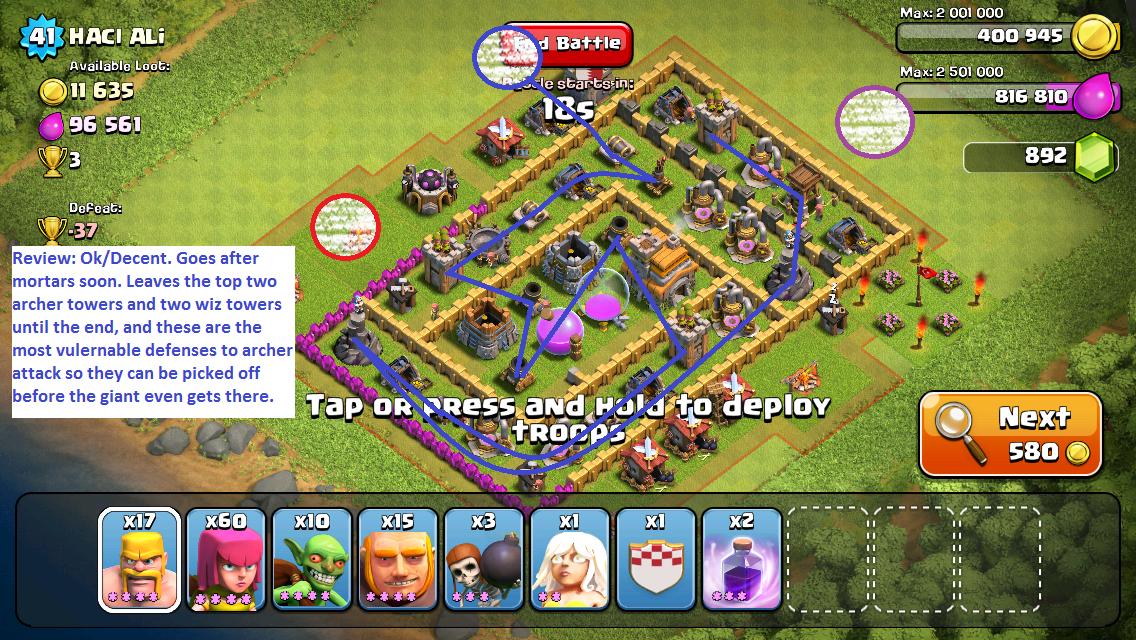
Now test yourself:
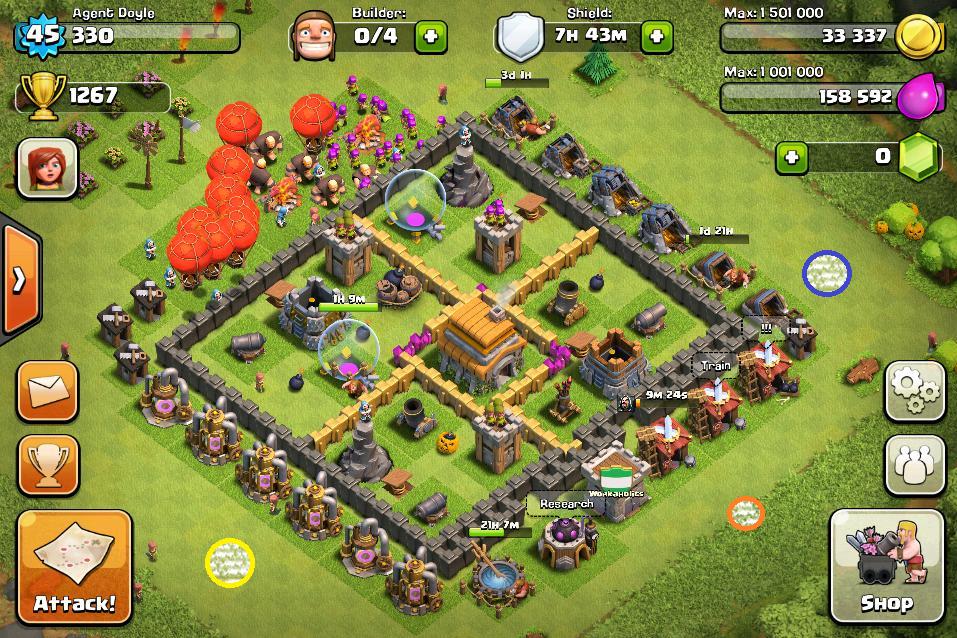
- Pick one of the colored dots in the above image
- If you placed a Balloon(s) here, in what order would it attack the defenses? (ignoring the fact that it might die)
- Check yourself against the answer for the color you picked below. Click the image to see a larger version. Then try another:
| Yellow | Blue | Orange |
|---|---|---|
|

|
|
Interesting Point #1 - Yellow and Blue
- After destroying the Archer Tower next to #1, why would the balloons go after the cannon rather than the Air Defense turret? Both are the same distance from the archer tower, and walls don’t matter. The Balloon would likely go after the cannon first because when it came from the Mortar, it didn’t hover directly over the Archer Tower, it stayed offset to the side of the mortar, making the balloon slightly closer to the cannon. If you had deployed 10 balloons, there would be some variance. I would expect maybe 2 of the 10 balloons would go after the archer tower rather than the Cannon, but the other 8 would probably go after the cannon.
Interesting Point #2 - Yellow
- After destroying the Air Defense turret, would the Balloon(s) go after the Mortar or the Cannon? This is a question of which is closer - it is hard to tell. Just estimating, they both look to be pretty close distance from the Air Defense, I would estimate a pack of Balloons would split up, some going for one and some going for the other. Lets see what the math says: (you obviously wouldn’t have time to do this when attacking)
- Mortar is centered 4 tiles away on the diagonal (4 up, 4 over) using the Pythagorean Theorem we can calculate this as a distance of 5.65 normal tiles in a straight line, as the balloon flies.
- Meanwhile, the Cannon is 6 units over, and 1 unit up, or 6.08 units in a direct line. Therefore, the mortar is actually closer, but it is a close enough difference we would probably get some balloons attacking each from the Air Defense.
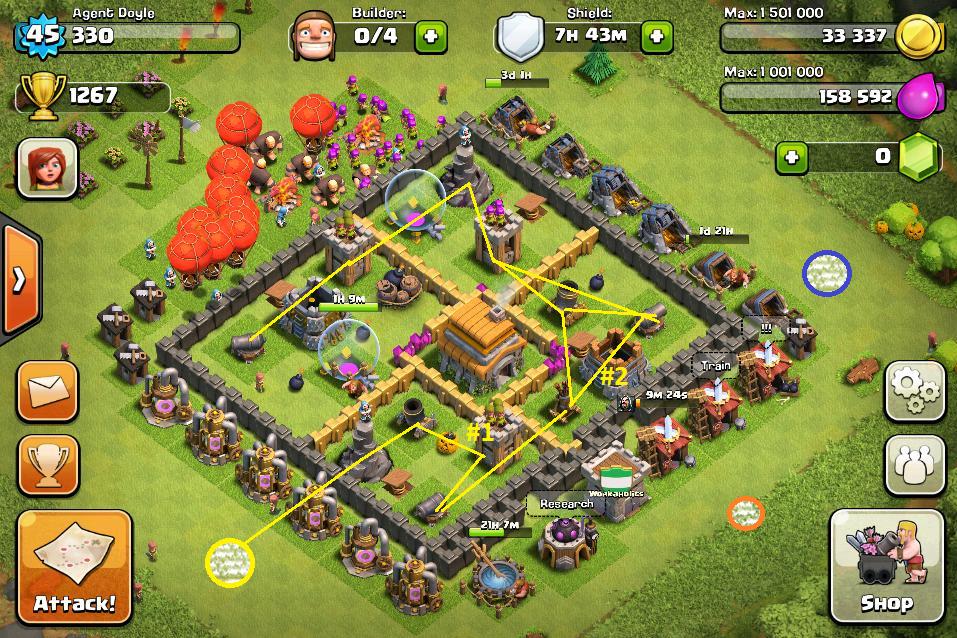
Interesting Point #3 - Orange
- Mortar is 4 up, 1 over 4.1 units straight line, Cannon is 4 over, total 4 units. See mathy explanation in interesting point #2.
Giants - Target: Defenses & Goblins - Target: Resources
Giants and Goblins are two units that are very good at what they do: taking out Defenses and Resources, respectively. They are more complicated than Balloons because of walls - and walls just make life more complex. So after reading the previous section about Balloons, we should all know that after spawning units go after their nearest favorite target. Once that building is dead, they then go after the NEXT nearest of their favorite target. But what happens if the nearest favorite is behind a wall? Well then the units need to decide which to go after. This is dependent on distance and how hard the closest target is to get to. The units will prefer to go after the close one, even if it has to kill a wall first, if the father target is more than roughly 15-20 steps away. Both Goblins and Giants operate exactly the same, except for their target.
IMPORTANT: Once it decides to attack a wall to get to their target on the other side, it will only stop attacking the wall if another nearby wall is destroyed allowing access to a target, not necessarily their original target. They will NOT stop if their target is destroyed by other units. This means if it is critical to “reset” the target of a giant, you can use a wall breaker to destroy a nearby wall.
In practice, it is harder to predict exactly how a giant will attack a base compared to how a balloon because it has to deal with the walls in the way. In reality, however, you don’t need to predict exactly where the giant is going to go during the entire match, just until it takes out the critical building you’re aiming for (typically mortar if you’re a lower level player).

You should also be thinking about other situations - What would happen if when the pack of giants was HERE, I used wall breakers to blow up the wall THERE? Would they divert?
Similarly, what happens if I use archers to pick off this one turret, do the Giants then perform better because they take a different route?
Thie image to the right is an example of combining several units and timing their attacks to coordinate.
Picture of giant path finding in simple base
Now test yourself:

- Pick one of the colored dots in the above image
- If you placed a Giants(s) here, in what order would it attack the defenses? (ignoring the fact that it might die)
- Check yourself against the answer for the color you picked below. Click the image for a larger view. Then try another: Purple and Blue and Red
| Purple | Blue | Red |
|---|---|---|
|
|

|
I actually attacked this base, you can see a slideshow of how I chose to attack and the results.


Here is a video of attacking a different base with giants and having to predict where they are going to go. Relevant section ony starts here.

Barbarians , Dragons & P.E.K.K.A - Target: Any
Barbarians, Dragons and P.E.K.K.As are quite simple. They simply attack the nearest thing. Barbarians and P.E.K.K.As, being ground units have to deal with walls while dragons don’t. All of these units are very tanky units, soaking tons of damage, while dealing a very respectable amount themselves. The only ‘tactic’ for using these units is to make sure whatever the nearest target is the one you want them to go for. This means you might deploy some barbarians to clear out some buildings outside of the enemy walls and some giants to break open the wall, then you can deploy more barbarians and if the closest target is within the walls, they will happily march through the hole you already created. You can see an enemy attempting this on a small scaler scale against me in this video [Relevant section: 1:08].
Archers , Wizards & Minions - Target: Any
Archers and Wizards and Minions, being the three ranged units in the game, are able to partially ignore those pesky walls that all of the ground units have to deal with. As Archers, Wizards and Minions have ‘Any’ as their favorite target, what they target is fairly simple - the closest target that they can reach. However, in the situation that there is something nearby that is just out of range, they will ignore it and go for the next closest, reachable, target. Archers can’t shoot over a wall followed by two empty spaces, followed by the building in question.
Healers - Target: Any
Healer AI goes for the nearest (usually) hurt ally and heals them until they are fully healed or dead, then finds a new target. Once locked on they will continue to follow their target, ignoring all threats to their life. They can only heal ground units, so don’t try to use them on Balloons, Dragons, or other healers. The most important feature about healers is their ability to cast in an Area of Effect - so they heal all units within a fairly significant radius of their target. They do not automatically heal clusters of hurt units, unfortunately, so hopefully the single guy the healer locked onto is staying with the clump. The Area of Effect is twice that of a wizard tower and half that of a mortar (although mortar has damage drop off farther from center).
As they are flying units, the Healer’s nemesis is the dreaded Air Defense turret.
Example video of Healer switching targets when full. Attack starts here and healer section starts here if you want to skip to the specific part. Same video from Giant section, if you already watched it, watch it from the healer link if you need a reminder.
Wall Breakers - Target: Walls
Wall Breakers have their own unique AI, and proper use is exceedingly important to succeeding both offensively and defensively.

I cover Wall Breaker AI in this video.
If you’re unable to watch the video at this time, here is the summary: Wall breakers attack the nearest wall. Additional wall breakers placed after nearest wall is destroyed continue in a straight line past the destroyed wall, allowing detailed aiming at inner walls of bases.
Here is a table showing how many wall breakers (of a given level, y axis) it takes to destroy a wall (of another given level, x axis)
| Walls Level | ||||||||||||||||||
|---|---|---|---|---|---|---|---|---|---|---|---|---|---|---|---|---|---|---|
| 1 | 2 | 3 | 4 | 5 | 6 | 7 | 8 | 9 | 10 | 11 | 12 | 13 | 14 | 15 | 16 | 17 | ||
| Wall Breaker Level | 1 | 1 | 2 | 2 | 2 | 3 | 5 | 6 | 7 | 8 | 9 | 11 | 15 | 19 | 23 | 27 | 29 | 31 |
| 2 | 1 | 1 | 1 | 2 | 2 | 3 | 4 | 4 | 5 | 6 | 7 | 10 | 12 | 15 | 17 | 18 | 20 | |
| 3 | 1 | 1 | 1 | 1 | 2 | 2 | 3 | 3 | 4 | 4 | 5 | 7 | 9 | 10 | 12 | 13 | 13 | |
| 4 | 1 | 1 | 1 | 1 | 1 | 2 | 2 | 3 | 3 | 3 | 4 | 5 | 7 | 8 | 9 | 10 | 11 | |
| 5 | 1 | 1 | 1 | 1 | 1 | 1 | 1 | 2 | 2 | 2 | 2 | 3 | 4 | 5 | 5 | 6 | 6 | |
| 6 | 1 | 1 | 1 | 1 | 1 | 1 | 1 | 1 | 2 | 2 | 2 | 3 | 3 | 4 | 4 | 4 | 5 | |
| 7 | 1 | 1 | 1 | 1 | 1 | 1 | 1 | 1 | 1 | 1 | 2 | 2 | 3 | 3 | 4 | 4 | 4 | |
| 8 | 1 | 1 | 1 | 1 | 1 | 1 | 1 | 1 | 1 | 1 | 2 | 2 | 2 | 3 | 3 | 3 | 4 | |
| 9 | 1 | 1 | 1 | 1 | 1 | 1 | 1 | 1 | 1 | 1 | 1 | 2 | 2 | 3 | 3 | 3 | 3 | |
| 10 | 1 | 1 | 1 | 1 | 1 | 1 | 1 | 1 | 1 | 1 | 1 | 2 | 2 | 2 | 3 | 3 | 3 | |
| 11 | 1 | 1 | 1 | 1 | 1 | 1 | 1 | 1 | 1 | 1 | 1 | 2 | 2 | 2 | 2 | 3 | 3 | |
| 12 | 1 | 1 | 1 | 1 | 1 | 1 | 1 | 1 | 1 | 1 | 1 | 1 | 2 | 2 | 2 | 2 | 3 | |
| Walls Level | ||||||||||||||||||
|---|---|---|---|---|---|---|---|---|---|---|---|---|---|---|---|---|---|---|
| 1 | 2 | 3 | 4 | 5 | 6 | 7 | 8 | 9 | 10 | 11 | 12 | 13 | 14 | 15 | 16 | 17 | ||
| Wall Breaker Level | 1 | 2 | 3 | 3 | 4 | 6 | 9 | 11 | 13 | 15 | 17 | 21 | 30 | 38 | 46 | 53 | 57 | 61 |
| 2 | 1 | 2 | 2 | 3 | 4 | 6 | 7 | 9 | 10 | 12 | 14 | 20 | 25 | 31 | 35 | 38 | 41 | |
| 3 | 1 | 1 | 2 | 2 | 3 | 4 | 5 | 6 | 7 | 8 | 10 | 14 | 18 | 22 | 25 | 26 | 28 | |
| 4 | 1 | 1 | 2 | 2 | 3 | 4 | 4 | 5 | 6 | 7 | 8 | 11 | 15 | 18 | 20 | 22 | 23 | |
| 5 | 1 | 1 | 1 | 1 | 2 | 3 | 3 | 4 | 4 | 5 | 6 | 8 | 10 | 12 | 14 | 15 | 16 | |
| 6 | 1 | 1 | 1 | 1 | 2 | 2 | 3 | 3 | 3 | 4 | 5 | 6 | 8 | 10 | 11 | 12 | 13 | |
| 7 | 1 | 1 | 1 | 1 | 1 | 2 | 2 | 3 | 3 | 3 | 4 | 5 | 7 | 8 | 9 | 10 | 11 | |
| 8 | 1 | 1 | 1 | 1 | 1 | 2 | 2 | 2 | 3 | 3 | 3 | 5 | 6 | 7 | 8 | 9 | 9 | |
| 9 | 1 | 1 | 1 | 1 | 1 | 2 | 2 | 2 | 2 | 3 | 3 | 4 | 5 | 6 | 7 | 8 | 8 | |
| 10 | 1 | 1 | 1 | 1 | 1 | 1 | 2 | 2 | 2 | 2 | 3 | 4 | 5 | 6 | 6 | 7 | 7 | |
| 11 | 1 | 1 | 1 | 1 | 1 | 1 | 2 | 2 | 2 | 2 | 3 | 3 | 4 | 5 | 6 | 6 | 7 | |
| 12 | 1 | 1 | 1 | 1 | 1 | 1 | 1 | 2 | 2 | 2 | 2 | 3 | 4 | 5 | 5 | 6 | 6 | |
Conclusion
Thanks for reading my guide. You can find more of my guides at Flammy's Strategy Guides. Check it out for links to my other guides as well as notes about editing and reproducing my content. I also produce Clash of Clans videos on YouTube, including a Let's Play (basically a playthough) starting at Town Hall level 4. Thanks again for reading, and hope to see you on my YouTube Channel.
Feedback
If this Strategy Guide contains any inappropriate content, please report it here: Clash of Clans Wiki:Report