"Tired of losing resources? Maybe trophies? Or getting defeated in war? Don't worry we got it all!"
Introduction
Many Clashers try to fight for a spot on the top of the leaderboards and the chance of immortalizing our name, declaring ourselves a true champion/victor. Many of us want to spread our glory as a clan by crushing others in Clan Wars. Many of us also want to save resources from attackers who want them. However, these can't be achieved unless we have a viable defense, carefully crafted, capable of withstanding various attacks with its objectives in mind.
Whether you're pushing, farming or warring, base design is crucial and contributes to success in the various routes we want to take.
This page is dedicated to sound strategy that will help you build your base. You should never copy any base you see on the web since any published base can have all weaknesses known. However, knowing how to build a base and having examples will allow you to create your own nuances in a base.
Foundation of a Great Layout
Building a defense means understanding how the troops that attack it work, what they target and ways to target them. Knowing the types of armies your attacker may be using goes a long way toward this goal. No base is a perfect defense against every type of attack, however building against common attacks can help ensure success.
Base Types
The first thing is to know what you're trying to achieve. There are many different types of bases that you can make in Clash of Clans and it is vital that you make a well designed base for the job that you want it to do. There are therefore a few fundamentals that you need to understand in order to achieve a good design.
Farming Bases are designed against multiplayer opponents who are farming for your resources. You are protecting Elixir, Gold and Dark Elixir from easily being stolen by making other targets more viable than them. You are also giving up minor resources and keeping major ones highly protected.
Farming Bases typically have their Clan Castle in the middle off the base along with any major resource storages close by. If a Dark Elixir Storage is owned, it is the most valuable resource so it is protected above all other resources.
Other resource storages are distributed evenly around the main compartments so you don’t lose all your resources at once. Make sure each of them is well protected by two or three well placed defensive buildings. Triangulation of defensive buildings is a very important aspect of your base. It is the idea that your defenses are distributed to ensure maximum coverage of your entire base. Triangulation is particularly important for Mortars and Air Defenses as they highly damage certain armies by the enemy.
Also make sure you put as many high level collectors inside your walled base as possible, as collectors can be an easy source of resources for an attacker if they are not emptied regularly. Low level collectors are not as important and good attackers will know the difference.
Segmentation is not as important in farming bases as there tend to be larger compartments that contain storages and several defensive buildings. However, it is still wise to use it when you can. It is recommended to have a layout like a 3 ring defence.
Firstly, in your first ring or main compartment, you should place your Clan Castle, most prized storage/s and a couple of defenses (e.g. Mortar and Air Defence). In the main second ring, split it up so you have roughly four compartments with a storage each, but also with several defenses (e.g. Gold and Elixir storages + Wizard Towers, X-Bows, Inferno Towers and Air Sweepers). And in your third ring, you should place collectors and other Defensive Buildings, like Cannons and Archer Towers.
The Town Hall should be protected like a storage, either in you center compartment, or the second layer, although that is risky.
If you want to win defenses with farming, then here are some tips;
1) Have your Town Hall in range of the highest level defenses, and make sure they can shoot Archers/Wizards too. Also have a possible maximum level Archer Tower, Cannon, and Mortar. If they can shoot Barbarians and Archers, then they will be killed very quickly.
2) You should have high level Gold Mine and Elixir Collector outside your walls. If you are a frequent player, then this wont be a very big problem; The attacker might see that you have a lot of available loot and attack your Mines and Collectors rather than your base. This is a good trick if you have level 9-12 gold and elixir storages, because they will usually look nearly empty; Then the attacker will realize that there isn't very much and the remaining troops will be unable to destroy the base.
3) Make sure you have no shield when you get of the game for a long amount of time; attackers will be more likely to raid before a lot of resources accumulate and you wont lose as much.
The Town Hall is normally situated in a main compartment with the Clan Castle, Air Defenses and Air Sweepers. If you are a higher level, it should be with the X-Bow, Inferno Tower, and Eagle Artillery. This means that whatever level you are, you need to have a centralized Town Hall that is heavily protected.
There are also normally a few walled layers between the Town Hall and the edge of the base. This may have defensive buildings inside or it maybe one space between walls to make attacking troops destroy another wall layer. Either of these methods is an effective way of slowing down potential attackers.
You also need to make sure that you don’t expose too much of your base as you can lose trophies at the one star stage of getting over 50% damage to your base. So you need to make sure that enough buildings are walled around but there are enough layers of Walls to protect your Town Hall.
However, you can lure attacking armies by placing your storages outside your walls. This will, of course, lead to major resource loss. If you are clever in your placement, you can cause significant damage to their army while they take your resources. You need to make a slight open inlet into your base where the storages are placed. Surround these with defenses so when the army is lured, you can almost wipe them out and keep overall base damage percentage low. They might not always target that building, so you will need to ensure that the rest of your base is still sufficiently protected.
A base that has worked for many low level players, that has good offense and defense proving a good base for farming and defense at the same time, is a base that looks like a piece of candy. The dimensions of the base are 12x12x12x12. You will then add square walls off the corners of the square. You should then place Archer Towers and Cannons inside the square, and then put your Town Hall, Clan Castle, good defences, Resource storages and anything else important inside. You will want to put Bombs and Spring Traps in the weak points of the base and the Mortar and other long range defences should be placed where it can cover the whole of the base. This base is usually for Town Hall level 5 and lower.)
Hybrid Bases
The most common type of base.
Aim: To protect both trophies and resources.
Air Defenses and Mortars need to be well spread, but they are normally also fairly centralised as well.
Consider what to protect the most.
You can have an interchangeable layout so you can swap storages with defences so that different things are more heavily protected.
Another thing you may wish to do is to place Wizard Towers around storages and within range of each other. This way you can destroy large hordes of troops and Goblins and Barbarians easily.
It is also recommended that you have your Clan Castle and Hero Altars as central as possible, so they can cover your entire base. Prioritise the positioning of these defences over Cannons or Archer Towers, which can be placed on the outskirts of your base.
Most Hybrid bases are segmented by walls so that each compartment isn’t very big. This is a good idea so that the enemy doesn’t steal all resources and destroy your Town Hall all at once. Spread out your valuables so they can’t steal it all at once. However, make sure they are still well protected. Make any attacker have to go through at least two walls to get to a storage.
Shield Grabbers
Shield Grabbing Bases are designed to get attacked, make the opponent use at least 33% of their army and receive around 30% destruction. This would give the defender a minimum of a 12 hour shield for a couple different reasons. First, you can request for Clan Castle troops to use in war at a later time. Secondly, for casual players who wish to use loot collectors (particularly Dark Elixir Drills) to their maximum ability.
This usually means giving up some type of resource in trade of a shield.
Typically using a Tesla by the "bait resource" will result in the opponent using enough troops to achieve a shield.
War Bases
Aim: The main goal here is to prevent enemies from gaining stars (especially all three stars) on your base, making it necessary for multiple attacks against your base.
These types of layouts are very common and can be similar to Hybrid and Trophy bases.
Commonly, the Defenses are the only ones barricaded by walls, leaving the collectors outside while Storages may be left outside or be placed inside to protect defenses.
The Clan Castle is commonly at the middle of the base where it is hard to reach as usually in wars it is more common to have Clan Castle troops in war.
Pocketing, Funneling and other ways of using your walls are included here.
Troll-like traps can be used to stop the ever important "Clan Castle lure" which many attack strategies need to succeed.
Engineered "anti-3 star" bases lean away from common practices and use troll-like lures to provide easy "2 star" access while preventing three stars. These can include easy access to the Town Hall to protect important defenses and subtle rings to funnel troops away from defenses.
Troll Base
A Troll Base is designed to fool the enemy into thinking that there is a fatal flaw in the base design and an easy target. Meanwhile, the flaw is actually a lure to decimate most attempts to exploit it.
These base types typically use an open avenue for attack. Some use gaps in walls while others use a "hole" in their base where troops can deploy.
Troll bases are seen both in the war and farming settings.
----
Putting Defenses to Use
Each defense has a job to do. Stopping different troop types and attack strategies is one of the most common ways to succeed.
Wall Breakers target walls that enclose Buildings. This means they ignore and go around free-standing Walls. Wall Breakersdon't just go to the nearest Wall; instead they go to the nearest compartment. Use this to your advantage by channeling them into gaps, where your carefully laid Traps can instantly destroy them. This method can also help defend against other Troops, such as Giants. In addition, the more time the Wall Breakers (and other Troops) spend moving and not attacking, the more opportunities your defenses have to kill them.
Wall Layouts in Bases
Scroll down for more content
Base layouts can be divided into two basic commonly used categories: Symmetrical and asymmetrical. Most bases have some amount of symmetry, whether they are partially, bilaterally or quadrilaterally symmetrical; others are bilaterally mirrored. They can be further divided by their basic defensive concept. Here are a few:
Single Wall: A single wall surrounding all or most of the buildings. Note: Archer raids work well against single layered base and very exposed to Wall Breakers. Overall, it is a fairly easy base to destroy.
Double Wall: Same as a single wall except it has another layer (separated by at least a single-tile gap) on the outside of it. It prevents Archers from shooting over it and prevents Wall Breakers from penetrating both layers.
Double- or Multi-Layered Wall: A portion or all of a wall segment with multiple layers. Note: Wall Breakers have splash damage that can break up to triple wall layers as if they were a single layer, so it is recommended not to use this wall type, at least not as part of the outer layer or two where Wall Breakers can typically target them.
Inner and Outer Wall: As the name implies, an inner wall protects the most valuable structures, with an outer wall fully or partially enclosing the inner wall and its associated defenses. It is essential to have your Town Hall at the middle of this type of base rather than outside of your base (this differs from people who are "farmers").
The Egg-Shell Defense: Multi-layered walls (usually 3 or more layers thick) in the center of the map with most buildings outside the wall and resources (possibly Town Hall) inside the wall. This concept is generally used for 'farming' villages.
Compartmentalizing, Enclosing or Section Defense: This manifests in different ways. The basic concept is to have various compartments of one or more buildings. It helps a lot to have multiple compartments inside your base as each must be breached separately, greatly slowing down attackers and making it difficult for Wall Breakers to reach the inner compartments in order to blow up the walls. Two walls together without any space in between isn't a good idea. It may stop Archers, but a Wall Breaker's splash damage will destroy both of the walls.
Gaps and Spring Traps: Leaving a few gaps is OK. You can place Spring Traps in between them to maybe kill a few troops, but this means there is a open compartment which troops can go in, which means leaving too many gaps could result in your base becoming too easy to navigate. Usally a few is good; but too many is a bit risky.
It is a good idea to have your outer walls upgraded to at least level 7 if you can to slow down your invading enemies. This is the point at which a single Wall Breaker cannot destroy it, regardless of the Wall Breaker's level.
What to Put Inside Your Walls and Why
Scroll down for more content
Splash Damage Defenses. Why? Because this way, when you are being raided, the attacker's troops will constantly be hammered by your Mortars and Wizard Towers. Splash damage defenses have an advantage over other defenses, such as Cannons, because those can only target one troop at a time, where as Mortars and Wizard Towers can deal damage to multiple troops in a certain area. When you put your Wizard Tower inside your walls by the storages, it can easily take out groups of Goblins and Barbarians.
Air Defenses. Why? If your Air Defense is unprotected, it allows attackers to easily destroy it with a just a few Giants, and then your primary aerial defenses are gone. This allows the attacker to put down hordes of Balloons, Dragons, Minions and/or Healers without worrying too much about them being destroyed because the Air Defense is really the only defense that works exceptionally well against air units.
Gold, Elixir and Dark Elixir Storages. Why? This is fairly arguable. If you are strongly trophy pushing, then feel free to put your storages out in the open to gain some quick trophies from a farmer who wants your loot. Also, it can gain you some trophies if you don't really need that specific resource as much. (ex: Elixir) But because these storages hold all (or almost all) of your resources, you'll probably want to keep them well protected, and the resource storages also have high hitpoints. Without your resources, you can't train troops, upgrade buildings or do just about anything else in the game.
Town Hall. Why? As of the December 2015 update, the Town Hall serves as a storage holding significant amounts of Gold, Elixir and Dark Elixir. As its destruction no longer grants a shield, coupled with the fact that it holds a sizable amount of resources, it should always be kept inside. If the Town Hall is the destroyed, the attacker instantly gains a star and you would lose trophies.
Other Defenses. Why? If you don't keep at least a few of your other defenses inside your walls, you will be defeated relatively easily. It is understandable that one may not have as many walls as are required to do so, but it is best to keep your highest level defenses within walls whenever possible.
Dark Elixir Drills. Why? Because they store your Dark Elixir when you are not online and it would be sad if it were to be lost (75% of Dark Elixir can be stolen from it)
Clan Castle. Why? Troops in your Clan Castle will be able to defend different areas, gives Archers and Wizards walls to hide behind, and makes it harder for opponents to lure your troops out into the open space where there are no defenses, especially in wars.
What should you NOT put Inside Your Walls and Why
Scroll down for more content
Army Camps, Barracks, Spell Factory and Laboratory. Why? Because these buildings have no real purpose when you're being raided (other than a percentage to gain Trophies/3 stars) to keep them within your valuable wall space.
Upgrading Defensive Buildings. When Defensive Buildings are being upgraded, they cannot function or assist in defending your base. Instead, (especially in the core of your base) they may just prove to be detrimental, attracting troops, particularly those that target Defensive Buildings. Switching these with other buildings may distract defense-targeting troops, such as Golem/Golemites, Hog Riders, Lava Hound/Lava Pups, or Giants. Letting these upgrading defences occupy the interior of your base does not help you at all. Though many consider this trivial, you have to remember that every little thing counts; It could be the difference between a devastating raid or a successful defense!
Gold Mines, Elixir Collectors (and potentially Dark Elixir Drills, though see previous section). Why? If you normally play every day, there shouldn't be all that many resources in your collectors. Therefore, there's not really a need to keep them inside your walls, even if you don't play very often. In addition, Goblins will be attracted to interior Gold Mines and Elixir Collectors, making it easier for the raider to access your inner Gold Storages or Elixir Storages. The only reason to keep these inside your walls is if you're a hardcore farmer, but it is strongly advised to use your walls for more important buildings such as Cannons or other defenses. Another reason to keep collectors inside your walls is if you are using a boost on them.
Put your Gold Mines and Elixir Collectors at a slight distance from the outside wall and have either a Mortar or Archer Tower inside the wall. Put a small Bomb at a slight distance from where you put your Gold Mines and Elixir Collectors. This will distract any opponent that usually deploys an Archer in order to lure your Clan Castle troops towards attacking troops in order to kill them. The key is to have as little areas as possible on your base from which the opponent can lure your Clan Castle troops far enough from your defenses. Experienced attackers will deploy their troops slowly in selective parts of your base.
Builder's Huts. Why?Builder's Huts are basically just a hut your Builder sleeps in when he's not working on something. It has no defensive capability whatsoever, so there's no reason to put it inside your walls. One exception would be to place one temporarily inside your walls to take space of at least 3x3 that you're saving for another building. Another exception is to protect these buildings making a 1 star 50% win more difficult for your opponents.
Decorations. Why? Because these are just waste space you could have used for something important, and could actually create a back door for enemies to place troops behind your defenses if the area they are in is at least 3x3 (see paragraph below).
Other Wall Info
Obstacles (trees, bushes, stones, etc.) cannot be used as walls or barriers! Troops can be placed directly on top of them, in front of them, or behind them! The same goes for Decorations (flags, torches, etc), Traps (Bombs, Spring Traps, etc.) and even Hidden Teslas. None of these (with the exception of Hidden Teslas, which are hidden buildings) actually have hit points like your buildings do either. Neither do they count as building space when you're under attack (even the Hidden Teslas, until they are revealed). For example, if you have a large area of at least 3x3 with only decorations or traps within that area, enemy troops can be placed directly into the area where those Decorations, Traps or Obstacles are during an attack on your village.
Advice
Wall Breakers have a bigger splash damage, so it is not recommended to use Double Walls, since they will destroy both lines of Walls with one blast.
If you find some buildings not necessary to protect, leave them outside as 'buffers'. Most enemy troops will target those buildings, even while your defenses attack them.
Defensive Buildings
Ranging from Cannons to Inferno Towers are apart of this foundation, it's how you place these buildings. If you want a base that would be able to withstand almost all attacks, here are some advice given by expert fellow clashers about where you should place your defenses.
Advices
Scroll down for more content
Mortars do best in the center of your base. However, do not put Mortars directly next to each other, as two well-placed Lightning Spells will destroy them both. They also cannot shoot at close range, so it is NOT recommended to place them on the edges of your village, where they can be destroyed before they have a chance to shoot. Mortars are exceptionally well at lower levels, so it is key to put them in the right spot.
At higher levels, Air Defenses also do best in the center of your base, but at lower levels (where there is not as much room, and fewer attackers will be using air troops) they are not as important as Mortars. It still helps to have them inside the Walls, however, so try to place them in one of the inner compartments if possible.
Cover as many buildings as possible with a defense so you do not give away free percentage. This includes other defensive buildings as well.
Space out defenses so they are neither too close nor too spread out. Defenses that are too close together cannot adequately protect the entirety of your village (there will be large areas that are completely defenseless). Defenses that are too spread out cannot adequately protect each other and will be easily overwhelmed.
Make use of the space inside the walls, but don't have a huge square with all of the stuff inside because as soon as your enemy breaks the outer wall he has very good access to everything inside.
Empty your Gold Mines and Elixir Collectors regularly, as attackers can take 50% of what is in your Gold Mines/Elixir Collectors and 75% for Dark Elixir. Not only will this mean that less loot will be stolen, it may cause the attacker to skip your village entirely.
Place Wizard Towers within a range of each other, making it easier to kill large groups more quickly as both towers will target them.
If you are trying to keep your resources, put Wizard Towers near your storages because they are very effective at killing Goblins, which target loot.
Putting Wizard Towers next to Mortars is a bad idea because 2 carefully aimed level 3+ Lightning spells can take out both of them together, which means there won't be much, or any, splash damaging defences. However, putting them a safe distance away will allow the Wizard Tower to defend the Mortar's "blind spot".
Place Bombs in clusters in places where Tier 1 troops are deployed, as several regular Bombs can take out Goblins or Archers with relative ease.
Put the Spring Trap in a place where you think Giants are most likely to walk through because one Spring Trap can take out 3 Giants at a time.
Keep your Clan Castle towards the middle of your village, so the troops inside can't be lured out easily.
While placing or re-locating the Hidden Tesla be careful as troops may spawn in that area if there is a big enough gap.
Try to make your base as symmetrical as possible as the walls will split the troops and prevent a horde from being focused on a single wall.
The above tactic can be hard to maintain as you gain more buildings and can become detrimental to your defensive design if not thoughtfully designed.
If you are upgrading your Cannons, look at the below tips:
Look at your base. Find some "strong" and "weak" points in your wall.
Let's say you have a Cannon covering both the weak and strong points. If you want to upgrade your Cannon, do the strong point first, because it isn't just protected by your Cannon. If you do the weak point first (this is especially bad at high levels), do you really want a place that is not protected by anything for some time to be attacked by raiders?
Then put your upgraded Cannon in the weak place, strengthening the weak point. The strong point doesn't need a stronger Cannon as badly.
When Upgrading Defenses:
If you have any defenses that are not being upgraded, switch them with the upgraded.
Move your traps temporarily around that (those) defense(s)
----
Conclusion
Whatever base layout you choose to make, always look back afterwards and think how you would defeat your own base. Ask yourself how you can improve it. Remember that there is no such thing as the perfect base; you just need to prioritize what you want. Also, try out each base type and see which works best for you.
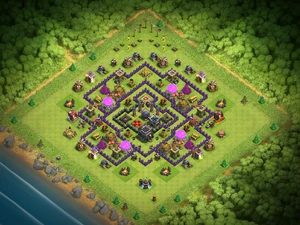
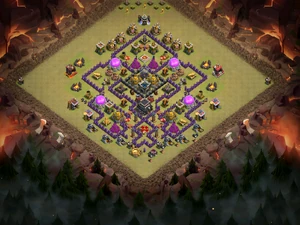
Base Layouts
Here is where you can find variety of layouts which your fellow clashers decided to share, have fun picking! (If you wish to put or publish your base in here, click this link)